Friday, 19 June 2015

4 Year-Old UFO

I was rummaging around in my office/craft room and encountered a UFO that I started back in 2011. I abandoned it only 8 rows from the finish. It is blocking now.
 
I used a mill end skein of Socks That Rock lightweight yarn that I bought at Rhinebeck back in 2009. It is a lovely, round, 3-ply sock yarn. It is a bit thicker than most sock yarns - the 100 g skein yields 360 yd.
The pattern is Mizzle, a free Ravelry download, and was given to me by my knitterly friend, JennB.  It is an easy knit. I would definitely recommend it for beginning lace/shawl knitters.

It has a bit of texture so is not mind-numbing to knit.
To block the round edge, I used these Premium Blocking Wires that I purchased on etsy from Inspinknity. They are well worth the investment if you plan to do any circular or semicircular knitting and blocking.
I used Jeny's Surprisingly Stretchy bindoff for the edge (closeup starts at about 0:55 on the video if you don't want to hear a lot of intro). Be warned, it consumes double the yarn so I had to tink back a row to have enough yarn to finish the project. I'll definitely be using this bindoff for the cuff of the toe-up sock I'm working on. I just found a video of this technique using a crochet hook. Note to self: remember to try that next time.

I was just looking at other people's Mizzles on Ravelry and noted it would look very nice using gradient yarn or striped yarn. Another note to self...

Tuesday, 16 June 2015

Modified GAAA Square

I completed another square. This time I took one from The Great American Aran Afghan (GAAA) pattern book.
I selected the interior of the Betty Salpekar square.
The construction of the bottoms of the curves was very interesting. it involved a lot of provisional cast ons of 3 stitches knitting a couple of rows of stocking stitch then grafting each end of the knitted tab. I got better at it as things moved along.
I was just having another look at the previous square and noticed a mistake. Do you see it? I'll give you a hint - it's a miscrossed cable. The braiding is supposed to be over, under, over, under.
This one should have been crossed the other way.
For over/under purists like myself, it is somewhat perplexing. However, I came by the mistake honestly. I just checked the pattern and the photo and it was written like that. Maybe the designer doesn't mind over, over, under, under but when I knit this again, I'm definitely going to cross that cable the way I think it should go.
I spent most of yesterday prepping Scooter's room/the guest room for painting. Almost every room in the house is a disaster area. Today I got the trim painted, masked, and one coat on the walls. I'll finish up tomorrow and start putting the room back together.

While I'm moving stuff around, I keep finding things to get rid of. We have SO much stuff and we really want to simplify things around here. I try to get rid of 10 things a day either to the donation bag, recycling, or garbage.

Last night I finished spinning and plying the carded fibre from the workshop I attended with the Kawartha Handweavers and Spinners last month.

Remember this stuff?
I chain-plied the singles to minimize the barberpoling. I got 62 yards out of the left skein and 100 yards out of the right one.
This one looks quite tweedy,
and quite a mix of colours from these batts.
 This one has more solid colour,
and was spun from these rolags.
My spinning peeps are already teasing me about what I should knit with them because, you see, I have lots and lots of handspun and hardly have knit with the stuff. I still look at each skein as one-of-a-kind and seem to be really averse to using it up.

Hence, one source of the aforementioned 'stuff'. This stuff won't be discarded though. Hopefully some special knitting or spinning project will intrigue me enough to use it.

And finally, this has been an exceptional year for the peonies in our garden. We have several varieties that bloom at different times. I have had a vase of then on my kitchen table for about 3 weeks now. And the tight buds I picked back then are starting to bloom now. As the blooms finish and start dropping their petals, I replace them with new ones from the garden. The scent is intoxicating.

Saturday, 13 June 2015

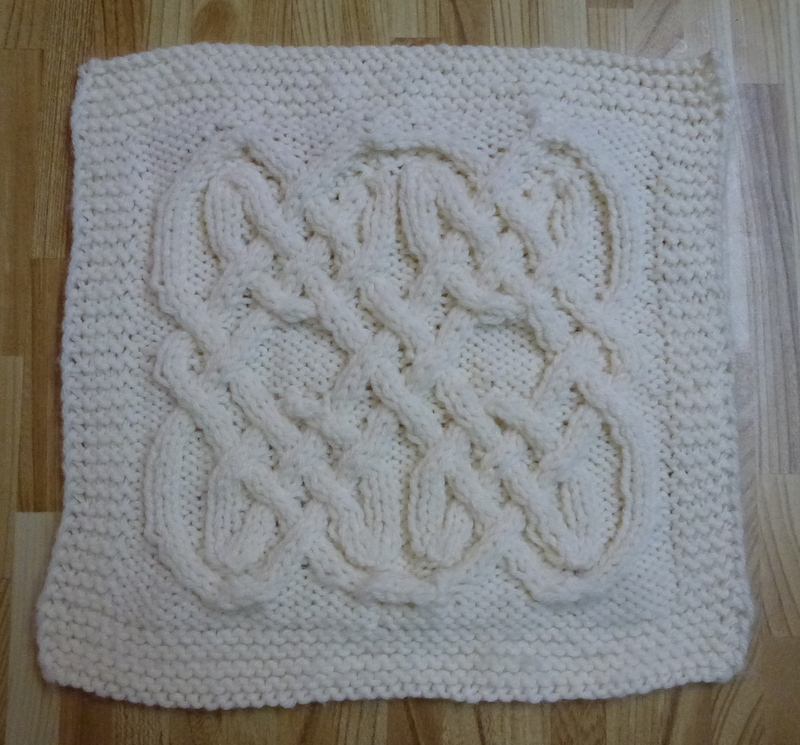
Viking Square

I continue working on squares for the cable project. This time I selected an intricate cable pattern based on an Islamic four-knot from the book JennB loaned me, "Viking Knits & Ancient Ornaments".

It took me three tries to accomplish this. My 'issues' weren't with doing the cabled centre but the borders.
In my first attempt, I added extra stitches to each side and extra rows to the top and bottom - too many stitches and it was too darned big.

The next time, I tried it, it wasn't big enough. Rip! Then I thought I'd just knit the sample from the book and add a border around the edge afterwards to make it the right size.

I'm still not thrilled with it because I tried to be a smarty-pants and increase every row on the border rather than every other row and it distored the border. I may unravel the border and re-knit it in the round in garter stitch, increasing every other row until it's the right size. Or, heck, I'll just reknit another one with my updated idea.

This book had a different 'lifted increase' that worked quite well. Basically, you lift and knit the 'granddaughter' stitch (to use Lucy Neatby lingo) below the stitch you want to add to on the right needle and knit the 'daughter' stitch below the stitch on the left needle.

I have many more to go.

Learning Something New

We are expecting out-of-town guests in a few days. I'll be painting Scooter's room/the guest room next week. We had our new gas range installed today.
On Thursday, I made new cushions for our kitchen chairs. Our butts had worn through the fabric of the old ones so it was time.

All the elements of my world aligned. Fabricland had a sale on the fabric I wanted to use, I found some good videos on YouTube, an online tutorial on making chair pads, and I had the time to do it.

While at Fabricland, I bought the cording to make the piping for around the edge of the cushions. I also bought solid fabric using one of the colours from the main fabric to make the underside of the pads and the bias strips for the cording. Making the cording is a fraction of the cost of buying it ready-made IF you can even find the right colour. The woman at the cutting desk was very helpful with the calculations.

First thing, I made a pattern. I had to tape a couple of pieces of newspaper to get a piece large enough. I did put marks at the centre of the top and bottom.
I also marked where I wanted the ties to go.

Then I made the bias strips to cover the cording. One of the tutorials suggested 1 3/4" strips so that is the measurement I used. I also used this width for the double fold bias tape I made for the 8 chair ties - each 25" long.

I then cut out the 4 pieces from the main fabric, adding about an inch of seam allowance, matching the centre markings on the pattern to the centre of the design. I made little notches on the fabric at those centre spots.

After making the cording, I discovered the #3 presser foot for my Bernina worked OK for the cording. I didn't need to go out and buy a special cording presser foot. The #3 has a little channel in the bottom. I put the needle in the rightmost position. I started in the middle of the back of the main fabric and sewed the cording to it all the way around allowing for 2" overlap. At any curve or turn, I clipped the seam allowance of the cording almost to the stitching, With the needle down, I was able to make the turns, making sure the cording stayed in the correct channel under the presser foot. I trimmed the cording so that the two ends butted each other and finished the seam. Another tutorial sewed the front and backs together at the same time sandwiching the cording and ties but I thought the way I chose would work better for a rookie like me.

I pinned the ties to the correct place, tacking them to the main piece so they wouldn't get caught in the stitching. With right sides together, starting just before one of the ties, I stitched around the cushion ending just after the tie on the other side. This left an opening for stuffing the cushion. I then turned the cushion right side out, unpinning the ties from where I had tacked them - ready for stuffing.

On one of the videos I watched, the sewist suggested buying an inexpensive fibre-fill pillow and using its stuffing. I bought two pillows at WalMart for $3 each.

Before filling the cushions, I cut out thin batting the shape of the cushion, and put it against the inside of the top of the cushion. I could have anchored it in place with spray glue but didn't bother. I then stuffed the cushion with small handfulls of the stuffing from the pillow.

Once I had filled it to the appropriate poofiness, I hand-stitched the opening closed.

Of course, the ties were in the exact spot they were supposed to be in.
I really liked how I was able to custom fit the cushion to the actual chair it was going on.
The piping looks very spiffy.
To eliminate slipping, I cut a bit of tacky shelf lining to go under the cushion. This will minimize excessive pulling on the ties.
And there you have it.
Since the fabric is still on sale, I'm going to buy some more and make place mats.

I really love learning how to do new stuff!

Monday, 8 June 2015

Garden in Early June

Here's a pictorial of the garden over the past few days. We live in suburbia but have an ample yard. Skip does 98% of the work so I really can't take much credit. This is the side of the house facing toward the back fence at the south.

This Jackmanii clematis has never looked so good. So many blooms...
Here's one opened to the max.
And the same one after the rain last night.
These rust-coloured irises are early bloomers. They're not in a great spot - right at the corner of the house and by the wound-up hose but the blooms are spectacular.
Last week at Costco I picked up a tub of these Asiatic lilies. The three plants had tight blooms. This is the first one to bust out. We suspect our previous one was eaten by one of the marauding critters. (more about that later)
We have several species of peonies.
After the rain, I go out and shake the water out of them so they don't bend right over.
This plant with the creamy yellow centre has intoxicatingly fragrant blooms. I wish there was smell-o-vision so I could savour the scent all year round.

These Siberian irises are quite small and are on tall, spindly stems. Sadly the blooms don't last very long.
In preparation for monarch butterfly propagation season, the milkweed is heading ever skyward. Near the end of this month, I'll begin harvesting the eggs. This year, I will have a nursery (canning jar) for each egg. Last year I had them all in one jar and they ate each other. We have several individual plants that have sprung up around the garden so there will be lots of places for the monarchs to lay their eggs and lots of tender leaves for me to feed the larvae.
Our marauding critter is a baby bunny. Isn't he cute? Don't be fooled. Here, he is munching away on one of my campanula carpatica (Carpathian bellflower) plants. Skip continues to erect wire cages around many of our plants as we can't seem to keep the little buggers out of the garden. We have set a live trap in hopes  of relocating the little fella to a more welcoming environment.


More Squares and Vanilla Bean Sock

While at Value Village the other day I picked up the Cables Mittens, Hats & Scarves book in the 'On The Go!' series. In it, I found a couple more cable patterns I wanted to sample.

This one is from Gayle Bunn's Fisherman's Pride Pompom Hat.
This one was from the Oliver Twist Double-Cable Scarf by Monica Jines.
I then explored Carol Feller's 'Contemporary Irish Knits' and found these two to try.

This is from the Straboy raglan sweater/pullover.
And this one from the Adrara belted cardigan/jacket. I am having some trouble vertically  centreing the cable element in the square. In this, my second attempt, The square is too short. I will need to frog it back to the bottom border again and knit more rows before I start the intricate cable element.
After not having it right the second time, I abandoned the squares for now but will get back at the project again. My knitterly friend, Jenn B, loaned me a wonderful book of Viking cable stitch patterns, 'Viking Knits and Ancient Ornaments'  which contains several interesting and intricate patterns to try.

In the meantime, I needed a portable sock project to work on during a trip into The Big City on Saturday to meet 4 of my sorority (Gamma Phi Beta) sorority sisters for lunch and gabfest. Two of them were recipients of baby sweaters as they both are expecting the birth of granddaughters. We do keep in touch via email and Facebook but it is so nice to get together face-to-face a couple of times a year. An overnight 'retreat' is being considered.

For the train ride into Toronto, I grabbed the Turtle Purl Turtletoes Stripes sock yarn and started a Vanilla Bean sock. I wanted a little something to add to the regular striping of the Polly Wanna Cracker colourway yarn.

I purchased the yarn as an irregular (74g) at the Knitter's Frolic in April. To use up all the yarn, I'm knitting it toe up. My biggest stumbling point about toe-up knitting is getting the heel in the right place so I'm going to do an afterthough heel, inserting coordinating yarn for the heel.

Slipped stitch pattern on instep
Basically, when encountering a colour change on the instep, begin a round of sl1, K1. Just knit regularly on the sole.
Stocking stitch on sole
 If the colour changes in the middle of the round, start the slip stitch pattern there anyway. Then continue it approaching from the other side to making sure to align the slipped stitch properly. There is a bit of a jog in the middle but the jaggediness of the slipped stitch pattern camouflages it somewhat.

 Once I am past the 'hinge' of the instep, I will do the slipped stitch pattern all the way around for the leg. My plan is to use up all the yarn. If, however, it is becoming inordinately long, I'll use the remainder for the afterthough heel. If not, a coordinating remnant of some other sock project will do. This yarn is very soft. I hope it will stand up. I also have the Trenchcoat colourway of this yarn in my stash.

Monday, 1 June 2015

Cable Squares

I have had such an urge to knit cables. I am knitting a series of squares incorporating various cable patterns gleaned from various sources - knit designer books, sweater patterns, stitch pattern guides, etc.

I hope to ultimately put the squares together for a lap blanket or perhaps an afghan. For consistency, I am using a garter stitch border of 47 sts - 5 ridges (10 rows) x 5 edge stitches. As many of the cable patterns pull the fabric in, I add any extra stitches in the 10th garter stitch row before starting the cable pattern.

My first test square was a cable designed by Fiona Ellis for the Celtic Icon hoodie in her book "Inspired Cable Knits". Interestingly enough, I posted a pic of my work on Facebook on Saturday as I was knitting out on the deck, enjoying the gorgeous weather we were having. Fiona recognized it and made a comment on my Facebook page. Good eye, Fiona!

My next test swatch was from Fiona's "Twisting With the Cable Girl" handout I received when I did her workshop back in '08. I cannot tell you how quickly cables go once you learn how to knit them without using a cable needle. I may not use this for a 'square' but perhaps will use the cable from the 'Practice Makes Perfect' scarf.
This square is from Fiona's "Sounds Like Fun" cable pattern. Initially, I cast on 54 sts (44 of the pattern plus 10 border sts). After knitting the cables, the bottom border was all ripple-y so I realized I needed fewer stitches. I snipped a stitch in the middle of the 10th garter row and reknit from the bottom of the cable down decreasing across the row to 47 stitches. Most of the decreases were done where the knit and purl stitches abut. This was actually the first 'square' I knit after the test squares, hence determining the border's stitch count for future squares.
This square is from the 'Must Have Cardigan'. I changed the braid on each side from 3 x 3 to 2 x 2. I also added 7 extra sts after the garter stitch border.
I also realized I hadn't properly interpreted the chart when I knit this cardigan for myself. I did a 2 x 2 cable in the travelling cable by mistake as I hadn't read the stitch definition properly. However, I like the look of the tighter/smaller cable better.  If I were to knit the cardigan again, I would change the wide travelling cable from 3 x 1 to 2 x 1 adding an extra reverse stocking stitch stitch on each side. so the cable wouldn't be so prominent.

This was a sample inspired by a couple of braids and cables.
These squares are knitting up quite quickly.

I am looking for other cable patterns to practice in books that I already have by Alice Starmore, Barbara Walker, Melissa Leapman, and other cable patterns.