Saturday 27 May 2023

Trying a Different Way

The predominant style of project bag that I've seen online is one that has all of the front in clear vinyl except for the zipper and the bindings around the zipper. Jen1, Marilyn, and I will be taking a class on making a project portfolio set which includes a small floss bag with a vinyl front, and a needle case. 

I've been thinking of making a vinyl-fronted project bag for quite some time so a couple of days ago I set to the task. My biggest issue is selecting the fabrics. One could get by with two complementary fabrics - for the back and the lining, but I chose a third fabric for the zipper tabs. To make things really easy, I used a pack of coordinating fat quarters.

I fused the lining to the batting and quilted the back piece (cut 1" larger on all sides) to the binding and lining.

For the first corner to corner quilting lines I used masking tape which I had stuck and peeled off my pants a couple of times to make it less sticky. Then, after aligning one edge of the masking tape diagonally, I stitched beside the tape, then peeled it off. I then used the spacer thingy with my walking foot which really made thing very easy at 2" intervals.


Then repeated for the other corner to corner diagonal.

After attaching the striped bindings to the zipper, I created the binding around the whole thing by folding the 1" margin in half then folded the doubled part over the edge and clipped in place. then sewed all around.
And that was it! Being the first time, it took me as long as the other way I make the project bags but I think I can do it faster now that I've been through the process. These were 3 of the fabrics in the fat quarter bundle. Very eclectic.
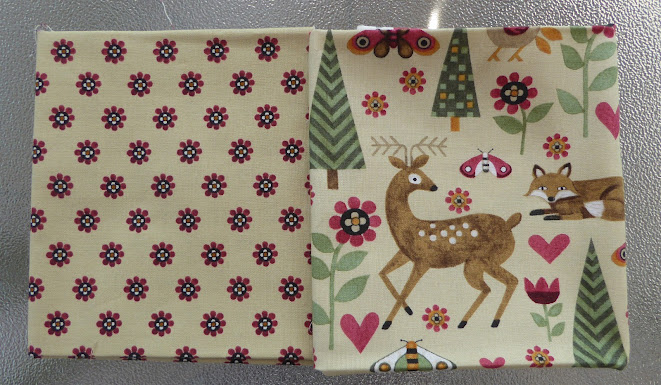
I have some Teresa Kogut fabrics I bought at last year's StitchNorth that are good candidates for these bags.
All 4 are from her Love of Nature line of fabrics so I could pair them as pictured then use some from one of the other pairs for the zipper bindings.


I wanted to create something new today but I wasn't in the mood to make another project bag. However, I did want to try one of the little pincushion projects inspired from the new book I bought.
I mean, who doesn't have a bunch of scraps they can make pincushions from? 

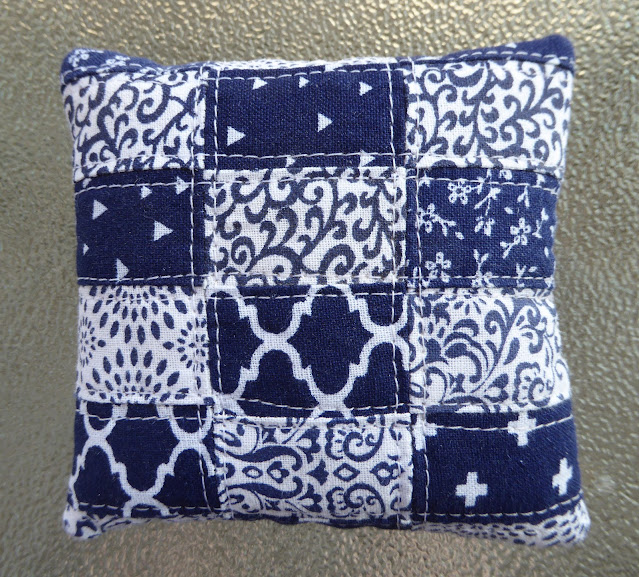
The one on the bottom right looked like fun and I had remains of a navy and white jelly roll I could use.
I made all the strips, sewed them together and quilted them with batting. For the bottom, I just made a 4-patch with 4 of the 2 1/2" squares cut from the jelly roll fabrics.

I stuffed it with sawdust and stitched it closed.

Ta-da!

My quilting lines were a bit wiggly. No matter.
I used the width of my presser foot as the guide to quilting the bottom piece.
It's pretty firmly stuffed with sawdust.


Using fat quarters and jelly rolls for project like this takes out all of the agonizing over what fabrics to use. It also gives me practice for when I ever decide to make bigger projects.

Sometimes I feel like my mind is a tornado of crafty ideas. English Paper Piecing, quilting, sewing, stitching, FFOing stitched pieces, watercolour painting. Thank goodness for my crafty hobbies. They certainly keep me entertained.

Tuesday 23 May 2023

Cardinal Kin

 I finished Cardinal Kin at my Monday morning stitch group yesterday. It is designed by Plum Street Samplers and was stitched 1 over 2 on 40ct linen. I then blinged it up with HotFix jewels in the birds' eyes and the centres of the big snowflakes.

Not quite sure how I will finish it. 
It was a nice, quick stitch. Not sure what my next project will be.

Friday 12 May 2023

A Little Bit of Birding

Nearby is a protected area for wildlife with the Waterfront Trail running through it. Skip and I went birding there today - just for a little while.

We noted a single patch of trilliums still in bloom.

I saw this flash of red and identified it as a scarlet tanager.
The faded Red Admiral butterfly spent a lot of time on the dandelion.
The striping on the antenna is really visible here.
We heard lots of birds that my Merlin app identified: Song sparrows, yellow warblers, ring-billed gulls, red-winged blackbirds, black-capped chickadees, American goldfinches, Northern parula, house wrens, white-throated sparrows, American redstarts, etc. We didn't see most of them but I did get some shots of a couple of other birds. A grey catbird. I love how the birding setting on my old Nikon B500 lets me get shots behind twigs and foliage.
White-crowned sparrow.
And a not great photo of a yellow warbler.
Then we went for coffee and ice cream cones. It was a nice outing.

Last night I started Cardinal Kin.
There are still a couple of skeins of floss I need to pick up. I did most of this stitching while watching TV and had to rip some rows out because I was having a challenge getting the right counting. I did fudge on the female cardinal's body but it won't be noticeable. To make sure the borders meet up properly I'll start the side borders in the vertical centers and work up and down to the top and bottom borders. If I have to fudge any more elements, I'm OK with that. When I stitch models for my designers I never alter the stitch counts but this is a piece for me and I know it will turn out just fine.

Thursday 11 May 2023

Conversion Charts for Floss AND Fabrics

I am trying to do as much crafting (stitching/sewing) from my stash. I have a modest collection of hand-dyed floss but unless the called-for colour is a large part of the motif where the variegation is desired, I will default to the DMC equivalent if I don't have the right hand-dyed colour.

There are all kinds of conversion charts available from one brand to another (i.e. DMC to Weeks Dye Works, Classic Colorworks to DMC, etc.). 

Today I wanted to start putting together the materials to stitch Cardinal Kin from Plum Street Samplers. 
There are two versions, the lighter one (pictured on the bottom), and the darker version Cardinal Kin II (top left).

I prefer the brighter, lighter version but didn't have the called-for fabric so I  'shopped' from my vast fabric stash. I recalled that I've seen some stitchery shop give a DMC equivalent to the colour of the fabric. Sure enough, Cross Stitching Supplies, stated the called-for fabric, Winter Brew from R & R is similar to DMC 3782.

Using my DMC Colour Card, I rummaged through my stash and found a very similar piece of 40ct fabric to DMC 3782. I have no idea what to origin of fabric it is - I just know it matches well and I'm happy to make a smaller version of the design.

Another handy online tool is Cody Hoover's Floss Color Tool. If I want to find an approximate match to a called-for DMC floss I often use it to find another DMC alternative. It also converts from DMC to Anchor to DMC.

Now I'll zigzag around the fabric, pull the colours, and get started.

Wednesday 10 May 2023

Needing to Feel a Sense of Completion

Today I had a strong urge to finish some things. I had the pieces of two project bags cut out and ready to sew. I just needed to cut the vinyl and lining and get to work.

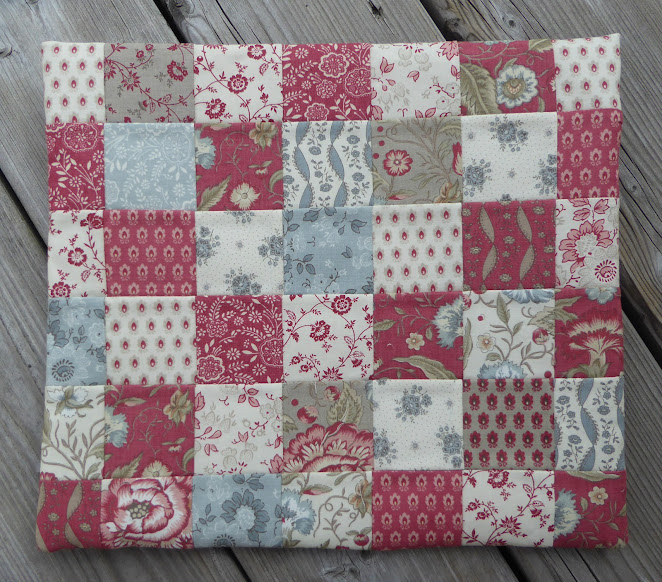
Creating the checkerboard patterns with 2 1/2" squares is time-consuming but very satisfying. Assembling everything took about the same time as creating the outer 'quilted' fabric.

I finished this one first. The fabrics are La Grande Soirée collection from French General. 

As random as they are, I separated darks, mediums, and lights and arranged them in a diagonal fashion.
It was interesting to work with the three palettes - red, grey-blue, and cream.

The zipper pull was made with what I had on hand.
I've had the Kaffe Fassett project quilted for about a week and assembled it today as well. 

There was also an attempt to arrange the fabrics in a checkerboard but I didn't worry too much about it. There was so much going on.
Basically I tried not to repeat a fabric in any row or column. This wasn't too hard as there were so many to choose from. 
The zipper pull is also very eclectic.
I enjoyed working with these 2 1/2" strips. I'm hoping to find more projects I can use them for.

I also sewed some pearl buttons onto the backs of 4 of my triangular scissor cases. 


Tuesday 9 May 2023

A Lovely Day of Stitching

Several of us met at Jen1's house today for some stitching. In her living room two of the walls are festooned with her beautiful samplers. She has been a busy little bee...

She was inspired to stitch this one when she saw it displayed high up on the wall at the now-closed A Stitcher's Garden in Fayetteville NY (just east of Syracuse). 

It's called 'As Ye Sow' by Rosewood Manor.

Black Cat 1861 Sampler from Samplers Not Forgotten
Time and Season Sampler by Moira Blackburn. She bought this pattern at The Stitching Post in Catonsville MD on our way to the Maryland Sheep and Wool Festival back in 2016.
Jen1 modified 'Christmas Garden' by Blackbird Designs by replacing the words 'Christmas Garden' at the bottom by the alphabet.
Catherine Theron's 'Morning Has Broken' was a workshop that Barb, Jen1, Poppy, and Jeanette attended in NY state in 2019. It was sponsored by the Corning NY chapter of the Embroidery Guild of America. The entire sampler used silk threads and specialty stitches - not a single regular cross stitch. Catherine's patterns and kits are not commercially available - only through her workshops. 
Jennifer modified the text in the right and left 'bubbles', continuing the lyrics to the song.

I love the way she has this piece framed. I think it's an Ursula Michael design.
I believe the lure of this Anna Thies 1859 sampler by Permin of Copenhagen was the kitty cat. So sweet!
This 'wee' piece was stitched 1 over 2 on 56ct linen. The design is from Mojo Stitches and is called 'Among the Roses'. It's stretched and mounted, ready to pop into an existing frame that is at another location and will be a gift to her mother this weekend for Mother's Day. It is stunning.
I'm not sure of the origin of this piece but I really like the sideways alphabet. the frame perfectly matches the blue in the houses.
The gallery of her hand-stitched samplers is really something to behold. The colour of her walls really compliment the fabrics in the pieces. 

It was a wonderful way to spend the day in wonderful surroundings.

Tuesday 2 May 2023

French General Squares

Last night I cut up some of my new French General charm squares into 2 1/2" squares.

These are from La Grande Soirée collection.
Bleu de France collection.
I also gridded some more fusible interfacing - 63 (9 x 7)  - 2 1/2" squares using a heat erasable pen. Note the squares on the edges don't need to be complete as the interfacing is just basting them in place. 

I had bought two bolts of the interfacing at the beginning of COVID to make masks and am just starting to use the second bolt. 

When I explored the French General website I came upon this delicious photo:
HEXIES!!!

My mind is whirling with possibilities as I only used 16 charm squares of each collection and there are 42 in a pack.

Monday 1 May 2023

A Kaffe Fassett Puzzle

I'm planning another project bag with the checkerboard layout. I selected 4 dark-ish and 4 light-ish jelly roll strips from the Kaffe Fassett Free Spirit jelly roll in my stash. Two bags can be made with these 8 (or more) strips. More dark and light strips make it easier for the layout but a minimum of 4 of each like this will work. The width of a fat quarter will work for this, too.

The other night, while watching TV,  I gridded a piece of featherweight interfacing with 2 1/2" squares - 7 wide and 9 high with a heat-erasable pen. The top bottom and sides don't need to be complete squares as the interfacing will be just a way to baste them all together.

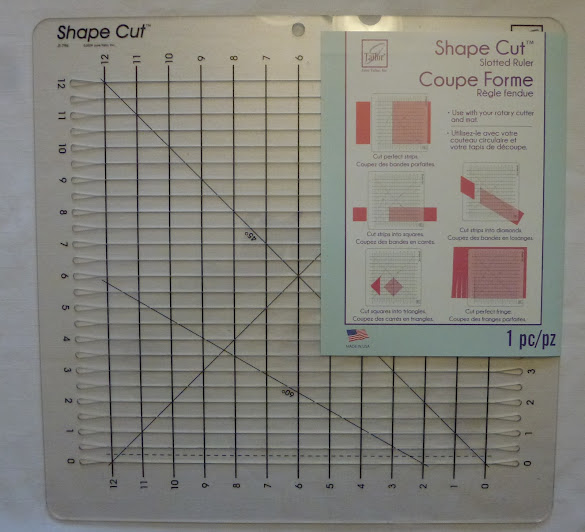
I then stacked the 4 light-ish strips and lined them up under my new Shape Cut cutting template. It has 1/2" slots - great for cutting 2 1/2" squares from jelly rolls. I bought this on my last road trip to the US and today was the first time I used it. 
I trimmed off the pinked edge on the left aligning the left with 0, I then cut at the 2 1/2", 5", 7 1/2", and 10" slots. Then realigned the rest of the stack and cut the rest for a total of 8 stacks of squares. 8 stacks x 2 1/2" = 20" so more than half the strips remained intact. If you don't have the fancy schmancy template, just cut 2 1/2" squares the usual way.

With the fusible side of the interfacing face up, I began laying out the dark squares in a checkerboard fashion then filled in with the light squares. This is where the puzzle comes in. There will be all 4 dark fabrics in one row and only 3 in the next. Another consideration is to try not to have two of the same touching at their corners. So far so good.
Then, press into place using a pressing sheet 
so the glue doesn't stick to the iron. Take care not to press beyond these fabrics so as not to erase the grid lines on the interfacing above.
Add the next two rows up (shown here below the horizontal line). Try to not duplicate a square vertically either. Here, the dotted squares are in the same column. I will figure out where to switch them. How do I do that? Just peel the square off the interfacing, relocate it, and press it in place again.

Anything below the horizontal line will be the back of the project bag. Above that line will be the three rows on the front above and below the zipper and below the vinyl window. Don't worry about duplicates between the top three and the bottom six rows as they're be on different sides of the bag.
One solution is to swap the two indicated by the arrows below. The result will have two of the same corners touching but I think it will look better than two the same vertically.

I think this will be it.
Press again. Now I'm ready to begin sewing. 

I'll fold a column (vertically) face to face with the one next to it and sew with 1/4" seam allowance from the fold in the interfacing. Then do the same with the next 5 columns. 

Now cut the top 3 rows away, one at a time, from the bottom 6 and set them aside. 

Taking the larger piece, fold the top row (horizontally) face to face with the one below and sew the 1/4" seam from the fold of the interfacing as you did with the columns. Do this 4 more times and your 7 x 6 piece will be complete with 'perfect' 2" squares. Isn't that easier than trying to chain piece 32 pairs of squares then sew them together etc. etc.? That completes the back piece. After pressing everything firmly, you'll cut and fuse the fusible batting (cut at least 3/8" smaller on all sides) and fuse to the 4 pieces - 3 strips and big piece. 

Complete the project bag with the usual procedure.


The remains of the jelly roll strips can make a second bag.