Saturday, 26 November 2011

Capybara Scarf Update

I got beyond the capybara design a couple of days ago and rather than tediously knitting both sides at the same time, I decided to put all of the red sts on one needle and all of the black sts on another and then I could just knit a stocking stitch tube.

I quickly realized I had a dilemma. How do I knit the intarsia in the round? I couldn't  figure out how to do it without an opening down the side. I figured there had to be a way I could knit a stocking stitch tube with one side in each colour.

At my regular monthly tea house knitting meeting, I asked the proprietor, Cheryl, a very skilled knitter, how to solve my problem. She quickly explained that I needed to put the red sts on one circular needle and the black sts on another. Then at the beginning of every row, I make sure I cross yarns and purl with colour A, then knit across with colour B. Then turn the work, twist the colours and purl with B, then knit with colour A. That way, the yarns get twisted on each side leaving no opening.

                                                             - - - - - - - - - - -    
       cross yarns on each side ---   X                         X                  
                                                - - - - - - - - - - -                                  
                       
 I happily began this and knit about 14". 

It's coming along, nicely. However, it kinda bugged me that the capybara was distorted and seemed to be squashed vertically. He kinda looks like a hippo and that just won't do. I had an inkling this would happen before I even started the project but was in denial and thought it would magically be the right proportion. So much for magical thinking.

Of course, it's because my grid paper had squares - which would be fine if my stocking stitch is 5 sts and 5 rows - a 1:1 ratio. But my stocking stitch on this project is 5 sts and 8 rows - a 5:8 ratio. In order for the capybara to be proportional, I needed to graph it on assymmetrical graph paper.

Where does one get that? Online, of course. So I 'googled' knitting graph paper and found this website. I had to do a bit of fiddling with the parameters so I could print grid paper the right width to accommodate my capybara diagram. And...I'm having issues with my printer. It keeps not wanting to print unless I shut my computer down and restart it. It's a software problem between it and my computer. Anyway, I'm pretty close to the right size grid paper. I just need to get my printer to print it. Then I can re-graph it with my knitting software.

Anyway, what I'm going to do is start again with the faux fringe and new capybara grid with the same number of stitches per row and same needle size and see how it looks. If it looks better, I'll just cut my knitting above the original capybara, conserving the pile of stocking stitch I've completed and graft it together with the newly knit end. I really do think it'll look a lot better.

Lesson learned? Measure the swatch and make sure your graph paper reflects your knitting ratio.

(a few minutes later)

So now I've printed my proportional graph paper and have traced the capybara outline on it.

And here is my new graph from my software that doesn't print assymmetrical graph paper.

The graph looks wonky but I'm pretty sure the capybara proportions will be more accurate once knit.

Stay tuned ...

Thursday, 24 November 2011

Rowan Kidsilk Haze Stripe


What happens when you hand Kaffe Fassett a ball of Rowan Kidsilk Haze yarn? You get Rowan Kidsilk Haze Stripe hand-painted yarn at double the price!Wheeee!

This yarn has just been made available in North America over the past month or so.

The striping is very random. There really isn't a pattern repeat in the whole ball! It does take about half the ball before all of the lovely colours are revealed.
And the yarn is so soft! I didn't really find it to be 'picky' at all. Right now there is only one pattern for this yarn on the Rowan website. The same pattern is on the back of the ball band. I look forward to new patterns for this yarn that are scheduled to be released this month.
I have two more balls of it in two different colourways to plan for.

Tuesday, 22 November 2011

Designing Woman

My knitworthy neighbour, Joseph, really liked the Twitter Hat I knit for him a couple of weeks ago. As he is the founder of Capybara Appreciation Day, I asked him if he would like me to knit him a capybara scarf and he thought that would be a great idea.

At KnitEast, I had taken a double-knitting class with Lucy Neatby (I'm SUCH a name dropper - LOL). I thought I could apply my new-found skill, knitting a capybara scarf for Joseph.

First, I needed a silhouette of a capyabara. I tried Google Images and after searching page after page, didn't really find anything appropriate. I tried a variety of other search words "capybara clipart", "capybara photo", etc. No luck. For some reason I looked on eBay and came across this photo.

I then printed out some graph paper and traced the outline of the photo onto the graph paper. I then opened my knitting software and charted from my hand-drawn graph.

I next had to figure out what yarn I should use. I wanted the scarf to be between 6" and 7" wide. Upon consultation with Stephanie at Myrtle Station Wool, we determined I could use fingering weight or sock yarn and 3.5mm needles to get the desired gauge.

Then I consulted with "Extreme Double-Knitting" by Alasdair Post-Quinn, a book I had bought at Rhinebeck. In it, there was a pattern called Corvus that was the perfect basic design. All I needed to do was substitute my capybara chart for the crow chart. I liked the 'faux fringe' at the bottom with the alternating colours. I used a two-colour cast-on and started right in alternating colours for a few rows (not quite as many as Post-Quinn's pattern), left 6 plain rows and then started in on the chart.
As one works with both yarns at the same time, the back is the negative, laterally rotated image of the front. See?
After knitting a few inches, I got a little nervous that I might not quite have enough yarn to complete the project. I had purchased the last red and black skeins of sock yarn that were in stock - 2 of each colour.

I did a bit of measuring and a bit of math. (Jump down a couple of paragraphs to ***  if math makes your head want to explode. I used to teach algebra so I like being able to use it for a practical purpose such as my knitting). After knitting 7cm, I had used 4g of yarn (I have a really useful digital scale accurate to 1 gram). I needed to know how far 50g of yarn (one skein) would get me. So I set it up like an equation and cross multiplied and solved for 'x' to get my answer.

                                                          4g  =    7cm
                                                        50g        'x' cm 

                                                       x = 87.5cm (34.5")

Therefore I can knit 34.5" with one skein of each colour of the yarn. 

*** I have two 50g skeins so I have enough to knit a scarf 69" long. I don't think I'll make it quite that long because it'll take forever but at least I know I have enough yarn to do it.

I'm hoping that once I'm past the first capybara, I'll just knit straight stocking stitch. That is, of course, if I can maintain the same gauge. In double-knitting, you knit both the front and back at the same time, alternating stitches. It's not too tedious when knitting a design but would be mind-numbing with no colour changes as one constantly switches the yarn from the back for the knit stitch to the front for the purl stitch. To knit the black stitches then the red stitches separately, I will have to re-arrange the stitches on the needles with all the black stitches on one and all the red on another. As I write this, I realize a circular needle would do the trick and if I need to change needles to keep the gauge the same that could be easily achieved with my interchangeable needles.

I hope to have the scarf done by Christmas even though I am working on about 5 other projects and just thought of a design for a pair of socks that I want to try.

It's a good thing I'm retired and have the time to entertain my creative pursuits.


Saturday, 19 November 2011

Moebius 2.0

I frogged the Moebius I knit yesterday (1.0) and re-started it with an 8mm needle and 132 sts. I wanted to eliminate the ridge of purl bumps that were in the previous attempt. Instead of doing one round of knit stitches after casting on, I started right in with 1 x 1 ribbing and knit the rest of it that way.

As the pattern is the same round after round (K1, P1 - knitting the knits and purling the purls), one can start casting off at any point but I needed to know how much yarn the cast-off would take. To ensure the bind-off wouldn't be too tight, I used a needle one size larger (9mm). Remembering the trick I learned at my Rowan workshop , I wound the tail end of the yarn around 132 times. I then put a slip knot at that spot. I knew I could knit to there and I'd have enough yarn.I started casting off and before even getting around to the halfway point, I encountered the slip knot. Rats! I wasn't going to have enough yarn!

I quickly realized that I needed to allot enough yarn for 2 times 132 stitches because there really are two 132 stitch edges. So I had to tink back all the way. When I doubled the yarn, I realized I still didn't have enough left so I had to tink back about 20 more stitches to free up enough yarn. I then started the bind-off and finished with about 80cm to spare. Here it is, showing the one twist.
 
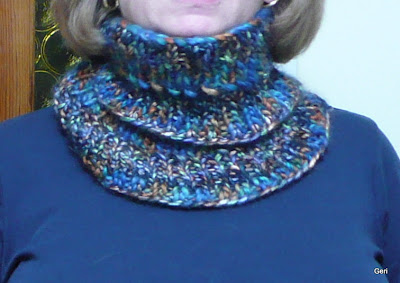
And when doubled, it made a cozy neck warmer.

Here is what it looks like with my coat on.
It will keep me stylishly warm this winter.

Another one-night project. C'est fini!

To summarize, here's the pattern I devised for Geri's Ribbed Moebius 2.0.

Finished size: 46" (117cm) in circumference, 4" (10cm) wide.
Materials:
- 100m chunky yarn like Berroco Borealis
- 8mm and 9mm circular needles at least 47" long (I think mine was 60")
- 1 stitch marker

Wind the yarn from the outside of the ball around the larger knitting needle 264 times to determine how much yarn will be needed for the bind off and make a slip knot. Or wind off 132 stitches worth and double the yarn and make a slip knot to mark this spot where you will need to begin your bind off.

Starting with the other end of the yarn, cast on 132* sts using Cat Bordhi's Moebius cast on. Place a stitch marker on the needle and begin K1, P1 ribbing. You will have completed one round when you encounter the stitch marker on the left needle (halfway around the stitch marker will be on the cable, not the left needle). Continue knitting the knits and purling the purls until you encounter your slip knot indicating the spot where you should start the bind off.

Bind off the knits knitwise and the purls purlwise.

Model the scarf for everyone in your household.

Enjoy!

This is a great pattern for any weight or texture of yarn**, for using up odd yarns, or any handspun yarns you don't have a lot of. Remembering you're knitting out from the centre, you can experiment with a variety of stitch patterns. Try (k2tog, yo) for a round to create some eyelets or a round of knits, alternating with a round of purls or the ribbing like I did. Whatever 'floats your boat'.

* cast on more sts for a longer Moebius or fewer sts for a shorter one. With this yarn and 8mm needles my gauge was about 2.8 sts per inch in 1 x 1 ribbing.
** you will need to work out your gauge for different weights of yarn to determine the number of sts you need to cast on.

Have fun!

Knitting With Berroco

This morning Marion, Elaine and I went to Threadworks, a touring, juried textile arts exhibition at the Whitby Station Gallery. The theme was trees. It will be there until December 4. It was a very interesting exhibition. But the fibre arts exhibit we went to in Oshawa a couple of weeks ago was more impressive.

We then went for lunch at Go For Thai at Dundas St. and Glen Hill Dr. (in the same plaza as the Coffee Culture at which we spin on Monday nights). The meals were tasty and the servings were large. All three of us took home leftovers.

Then we decided to drop in at Kniterary as neither Marion or Elaine had been there in a while. I couldn't resist the Berroco Link yarn after I had seen Marion's scarf. 19mm needles (US size 35) are required. Fortunately I already had a set of them at home. The pattern is on the back of the ball band. In an hour, I finished the scarf! (I just needed to tuck the yarn tail in better).
I LOVE the colours of this colourway. The yarn is a loose, 6-stitch i-cord and the resulting scarf, although stocking stitch, looks like gigantic i-cord. Nifty!

I bought some beautiful Berroco Borealis yarn in a multicoloured colourway and spent some time on Ravelry trying to find an appropriate neck-warmer pattern. I had one half-knit before I realized I didn't like it after all.

All this knitting, by the way, was being done while I was watching all 8 hours of Ken Follett's "Pillars of the Earth" DVDs I've borrowed from the library and need to return next week. I've been listening to it on my iPod touch. I'm ready to start CD 14 of 32. It's 47 hours of listening, apparently. When I get sick of listening, I've also borrowed the book and actually read sometimes. I had planned to finish the book/CDs before watching the DVDs but they arrived back at the library last week so I could borrow them. I'm not sure if I'll finish reading and listening to it but I have enjoyed it thus far. But I digress...

I finally decided to do a ribbed Moebius inspired by the Rib Stitch Chunky Moebius on Ravelry. I was too cheap I didn't want to buy the pattern so I thought I'd refer to the Cat Bordhi video on YouTube for the cast-on and design one myself. I wasn't quite sure how many stitches to cast on and remembered I have her "A Treasury of Magical Knitting" book in my library. Sure enough, on page 20 there's a chart that indicates the number of stitches to cast on based on the gauge.

I knit one round and then began the 1 x 1 ribbing.

After about 10 rounds, I decided I didn't like the ridge in the centre formed by that one pesky round of knitted stitches so tomorrow I'm going to frog it, cast on again and start right away with the 1 x 1 ribbing.
Pesky ridge of knitted stitches
I think it's going to look very spiffy once done. It should also be quite stretchy.
Desired result

Wednesday, 16 November 2011

A Break in the Action

Skip and I left last Thursday to attend a wedding in Indiana. We got home on Sunday evening full of cold germs and with scratchy throats. I've spent the last two days in bed and today have scraped myself off the sheets to go knitting this afternoon.

To let you know how sick I've been, I haven't knit a stitch in 2 days!

I have, however, been working on a couple of projects and will fill you in when I'm feeling a bit better.

Monday, 7 November 2011

Embossed Leaves Socks - Done!

This afternoon I finished the second Embossed Leaves sock. My photography doesn't do the stitch definition justice. Suffice it to say it's a lovely, lace pattern that is easy to knit.

I didn't do the 3 sts of garter stitch at each side of the heel flaps. What I did do was twist every other stitch on the bottom of the heel and at the ball of the foot and toe.

The twisted stitches change the texture of the stocking stitch a wee bit. Note the smooth stocking stitch on the gusset contrasting with the twisted stitches underneath the heel flap.

Twisting the stitches strengthens the yarn. Always twist in the same direction as the twist of the yarn to give it more strength without using reinforcing yarn. If you twist the wrong way, though, the sock will wear out twice as fast as you are weakening the yarn. It's a tip I picked up at my sock-knitting workshop with Cat Bordhi last month.
The Cascade Heritage sock yarn is very soft. I will encourage the recipient to hand-wash the socks and dry them flat.
There are several other sock patterns from this book that I will try at some point. It really is my favoUrite sock book. :-)

Sunday, 6 November 2011

Both Pairs Are Done!

Since October 27, I have knit two pairs of men's socks. I just finished the second pair last night. Yay!
I had not taken the time to weigh the first sock to see how close to half the yarn I had used. I was getting nervous during the toe decreases for the second of the lighter coloured socks as I didn't think I'd have enough yarn to finish and graft the toe. I had already decided I was going to chain-ply the matching reinforcing yarn to get a thick enough yarn to finish the project. Fortunately, I was able to finish the 2nd sock with a couple of yards of yarn to spare. Once I got them done, I went back and ripped out the toe of the longer of the two darker socks and reknit it to match the length of the other one.

One would think that would be enough sock knitting for a while but OH NO, I went back to the second Embossed Leaves sock and picked up where I had left off - having turned the heel and getting ready to pick up the gusset stitches along the heel flap. I knit away on it for a while and when I went to begin the twisted-stitch reinforcement on the sole at the ball of the foot, I compared it to the first sock, counting the number of lace pattern repeats up to the reinforcing. I kept getting an extra repeat in my count on the second sock. It took me about 20 minutes before I realized I had KNIT AN EXTRA LACE PATTERN REPEAT on the leg of the second sock. Rip! Back I frogged and picked up the stitches all around only to discover I hadn't ripped back far enough and had to tink back about 5 more rounds before I could resume forward progress ...  restarting the heel flap. And on and on it goes. I hope to get it finished tonight and get it blocked and ready to send off to its recipient.

I got some good news this week. When I was at the Woodstock Fleece Festival a couple of weeks ago, I dropped into the Feather Your Nest booth and said hi to Terri O'Brien, the proprietor. When I made my purchase, she told me that if I joined her shop's Ravelry group, my name would be put in a draw for a $25 gift certificate to her shop. I WON! I hope it arrives Mon. or Tues. because I plan to use it on Wednesday when I'm in her area.

A Perfect Leaf

I have been taking full advantage of our wonderful, sunny (albeit cool) weather these days, to take daily walks around my neighbourhood. I have ripped 22 of the 32 CDs of Ken Follett's "Pillars of the Earth" to my iPod Touch and between actually reading the book (which I have borrowed) and listening to it on my iPod Touch, I'm working my way through it. It also keeps me aurally entertained on my walks.

Today on my walk, I looked down and spotted the perfect maple leaf.
Its redness jumped out at me amid the predominantly yellow leaves on the sidewalk. And it was perfectly formed.

Harkening back to my Brownie days almost 50 years ago, I remembered we used to collect leaves in the autumn and iron them between two sheets of waxed paper sandwiched between sheets of regular paper. When I employed this technique today, it darkened the red a bit but it should keep it from getting all brittle and crumbling.
I guess there's no real way to preserve that vibrant red colour.

This year, we didn't really get a cold snap early in the fall where I live so also didn't get the wide array of colours as we usually do. However, it is still a beautiful time of year and will be until the last of the leaves fall.

Wovember

I was just perusing some of the blogs I regularly read and I came across this idea dreamed up by Kate Davies and Felicity Ford. I'm always up for some type of celebration, especially a wooly one.
Since learning about Kate Davies' designs on my UK knitting tour, I have put a couple of her hats on my knit list: Sheepheid
and Peerie Floores.
In Wovember, we observants will "show our collective appreciation of wool by wearing as much of this fabulous fibre as possible" among other things.

Happy Wovember, everyone!


Friday, 4 November 2011

Yet Another Sock

I finished Shingo's first sock last night.
I used the reinforcing yarn that comes with the Jawoll yarn for the short rows on the bottom of the heel and about an inch of the sole in front of the heel. I only knit it on the sole on every other round. I cut and wove in the ends. Most of the sole was knit without the reinforcing yarn but I started using it on the ball of the foot and again, only on every other round of the sole, cutting and weaving in each time. Once I started the toe decreases I knit the entire toe of the sock using the reinforcing yarn including when I grafted the toe closed. It really looks quite good, if I do say so myself.

I have about 4.5" of the leg of the second (AND LAST of these two pairs of socks) on the needles.

After I finish this one, I need to rip out the toe of the longer of the two Todd socks, rip it back another 1/2 inch and reknit the decreases and graft the toe. Then I'll steam block both socks and wrap them.

Then I'll finish the second of the Embossed Leaves socks and block it.

Skip has informed me he would like me to knit him a pair of ankle socks to wear to bed to keep his feet warm. Each one is like half a sock, right? They shouldn't take too long. I have some stash yarn I can use for them, too.

Skip and I were out today and noted a sign on a boulevard advertising cheap PCs and laptops. We went in the store and discovered a business that receives computers that have gone off-lease and redistributes them for resale at a fraction of the cost. I picked up a Dell Core 2 Duo for $199 and spent the rest of the afternoon installing programs. This evening I tried to post my blog and my browser kept crashing each time I tried to upload the sock photo above. I was not amused. I began uninstalling programs and I guess I uninstalled the right ones because I was finally able to get the photo to load. I'm not sure I'm going to keep the PC. Fortunately there's a 3 month warranty.  Stay tuned...

Tuesday, 1 November 2011

One Pair Done!

I finished the first of two pairs of socks last night
and I've turned the heel on the first of the next pair. 
I'm on schedule - yay! But I'm itching to get back to the Koigu Linen Stitch scarf and the Kidsilk Haze Stripe scarf.

Back to knitting...