Wednesday 31 October 2018

Craft ADD

I've been flitting from one project to another lately.

When I was in Woodstock, I was given an old issue of "A Needle Pulling Thread" magazine. Therein I found a maple leaf pattern that appealed to me with instructions for making a scissor fob, a needlebook, or the top of a box - depending on the gauge of the fabric.

I couldn't find the Caron Watercolours colour that was called for but found a very acceptable substitute in DMC 4511.
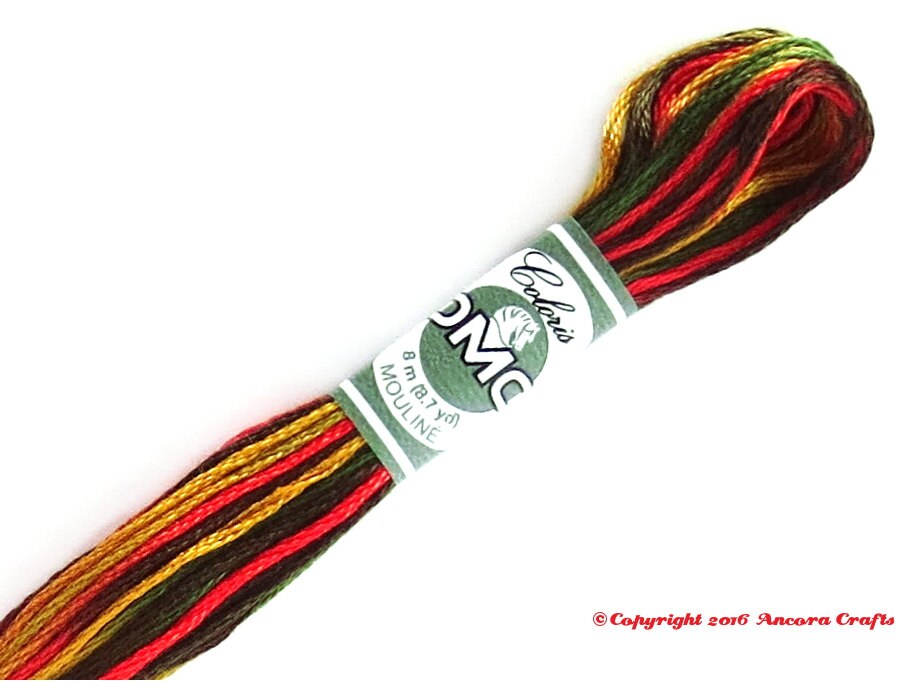
The brown parts are too close in colour to the dark brown veins so when I get to that spot in the thread, I just pull a loop at the back until I hit the red, green, or yellow.

There are more border stitches to go. I think I'll make a needle case out of this.

I also finished the 27 snowflakes in the Hapsburg Lace piece I've been working on.
I now need to do the snowflakes all around the border.

Yesterday I also started the process of finishing some of the ornaments I've stitched. I will be making cording to go around the outsides. Here, the backs have been glued to the fronts and are clipped until the glue dries.
I have many more to finish.

On the weekend, Marilyn and I ventured to Peterborough for the Hand of Man craft show. The farmer's market was going on in the parking lot. I picked up a bushel of apples that weren't perfect for display but totally serviceable for apple sauce. They had minor breaks in the skin but only bruises on a couple of them. This afternoon I processed about 2/3 of them before I ran out of space in my big pot. I also ran out of snap tops so will pick more up and finish the job tomorrow.

Friday, Jen, Barb, and I will head off to our knitting retreat at a resort on the Ivy Lea Parkway near Gananoque at the east end of Lake Ontario. I need to start thinking about what knitting I'll take and get my homework done for the one class that requires it.

As I write this, we are investigating taking an introduction to rug hooking class in Belleville on the way to the knitting retreat.

So many crafty things!


Monday 29 October 2018

Needle Case

I found an easy pattern to make a sewn needle case on Pinterest. I bought wool felt for the interior on the weekend at From the Heart Quilt Shop in Bethany.

Instead of tracing the outline onto the wool. I cut a piece of freezer paper to 8 1/2" x 11" and copied the template onto it with my printer.  Then I ironed the freezer paper onto the wool and cut it out.
I drew the crossing lines onto the felt with a heat erasable pen and stitched it on, backstitching at the beginning and end of each line. Careful ironing ensured that the case would fold properly.

I then marked, poked holes with the awl, and attached the plastic snaps with the Dritz tool (purchased for 1/2 price at Fabricland).

All closed up.
This was a pretty easy project. Next time, I'll make a template so the interior felt is consistently 1/4" inside the outline of the outer piece. To save a bit of time, I'll do a search for other needle cases like this online.

Wednesday 24 October 2018

Confused Warbler Needlebook

I more or less finished the 'Confused Warbler' needlebook. 'Confused' because the bird is an indeterminate species. Green?

I want to embellish the leaf on the front.
I had fun doing various 'veinings' on the leaves on the back.
The inside is rather plain.  I used both pieces of white felt for the pages.
But the outside is comparatively snazzy IMHO.  My inconsistent blanket stitch gives it a primitive look, n'est-ce pas?
Barb, Jeanette, and I have signed up for a felt appliqué class at the Quilter's Cupboard in Uxbridge on December 7. We're going to go up there in a couple of weeks and look at the patterns offered.  I hope the project isn't too big as this little one ( 8" x 4" or 20cm x 10cm) was just about right.

Monday 22 October 2018

A Sheep Under the Snow

I stitched this up this weekend. Everything was in my stash.

Un Mouton Sous La Neige by SAMISA
It's a free pattern from Rêve de Fil.  I was directed to it from Pinterest. I liked the blue house she stitched on the dotted fabric then made it into a little zippered bag.

Wednesday 17 October 2018

Block Party Home Pincushion

I finished the 'Home' pincushion last night.
The light interfacing that I put on the backs of all the pieces really kept them even and firm.

Thanks to the wool appliqué workshop I attended on Sunday I confidently attached the plaid wool square with an evenly-spaced blanket stitch.
There's a different blue house on each side.
I couldn't just leave the bottom blank.

 The red houses are on the corners.

I chose not to invest $25US in the HOME pins. At some point I may make some with FIMO.

One modification I did was to use a thread that matched the fabric for the backstitching and whip stitching joining the pieces. I wanted it to blend in more with the fabric. (Compare to the photo above)
I have another chart in this series: the WOOL Block Party pincushion.


I covet a couple of others in this series.  This one:

this one:

and this one:

I really like the colours used in the Hands On Design patterns. Check the list of stockists and see if there's one near you where you can order the patterns. Click on 'State' to order them in alpha order and scroll for your province or state.

My HOME pincushion will definitely be featured at the guild's 'show and share' tonight.

Tuesday 16 October 2018

Quick and Easy Dyeing

I wound off 5 - 20 grams hanks of yarn in preparation for the KoolAid dyeing. I used Kroy Socks 4-ply in the Muslin colourway and unsweetened KoolAid.

The first batch was Lemonade. I was so excited, I didn't get a shot of it with its packet. I did use 2 packets of KoolAid in hopes it would be a stronger colour. I nuked it for 2 minutes, rested for 2 minutes, and nuked it again for 2 more minutes.
Then I tried orange.
Although the water is milky, all the dye was taken up by the yarn.
The pink yarn is acrylic which I tied onto the hanks to make it easier to pull the yarn out.  The white/light spots are where I had tied the hank with its yarn. It will show when knit but should blend somewhat nicely with the tonal yarn.
This was Ice Blue Raspberry flavour. I only had to nuke it for 2 minutes.
Lemon-Lime. The yarn really turns out the colour on the packet. Everything is food grade so regular kitchen utensils and bowls can be used. Cleanup was really easy.
Cherry.
I dried them overnight and wound them into balls today.
All ready to knit.

This would be a great way to dye yarn for a baby sweater or dyeing wool felt for an applique project. It would be fun to do with your children or grandchildren and then knit them something they want with the yarn. The dye is permanently set with the heat and the citric acid in the KoolAid so no fading over time.

Monday 15 October 2018

Kool Aid Dyeing Preparation

I knit a square or two every night on my sock yarn blanket. It's growing - slowly. It's pictured here sideways.
It's currently 3ft wide and 2ft long. I hope to knit up most of my sock yarn leftovers so it should be quite large when I'm done.

My sock yarn bits aren't very exciting colours for the most part and I was wondering how I could jazz up the squares. Penny Pierce from the wool appliqué workshop yesterday mentioned that she custom dyes a lot of her wool fabrics and I realized i could do the same with bare or light coloured sock yarn.

I have lots of KoolAid packets in my stash that I bought years ago. I could wind off 10 - 15g lengths of sock yarn and KoolAid dye them in my microwave!
That would give me lots of bright colours for the blanket. The customary amount is 1 oz. of fibre per packet of Koolaid but using less yarn should yield me a deeper colour.

I will definitely be doing some experimenting...


Felted Appliqué Needlebook Workshop

Yesterday Diane and I attended a workshop in Bethany conducted by Penny Pierce - a wool appliqué artist who works at From the Heart quilt shop in Bethany ON.

She had little trays with tools for us to use.


What a great idea for lining little trays?

There were also some cute pin cushions with buttons.


Back view.
 Then she showed us several of her other pieces with felt appliqués. Many had been taken from traditional patterns but she preferred brighter, bolder colours.
Her appliqué technique makes the wool puff up a bit without having to stuff the piece. It simply involved angling the needle a bit.
Oh! And we were all given a size 24 Tulip needle - a keeper for sure. Penny also recommended micro serrated scissors if we were going to do more working with wool felt. They grab the wool when cutting so it doesn't slip. They make for really accurate cutting of wool appliqué piece. They come in various sizes and are available online from several vendors.

This quilt had lots of cute elements.

This table mat was a real stunner.
There was so much detail - all so simple to execute.
Climbing roses.
This Christmas table mat was so simple, yet so cute.
All our kits were the same so there was no fighting over different colours. We got a lot done during the workshop and left with all we needed to finish the project and sew the inside to the outside.

When I got home I got the rest of the leaves and the berries done.
Now I need to do the stems and embellishing. I'm also going to use a bead for the bird's eye.

The white guide lines are made with a chalk pen and will rub off when I no longer need them. the outer ones are the guidelines for the buttonhole stitching that will go all the way around.

Penny is a very skilled teacher and fibre artist. I would definitely take another project-based class with her.

An added bonus for Diane and me was the beautiful fall colour tour as we drove through the Kawarthas. We had hoped to visit the quilt shop before returning home but it closes at 3pm on Saturday so it was not open after our workshop. I will be driving this way when I go to the Elim retreat in November so will definitely stop in for a visit.