Thursday 31 May 2012

Homecraft

Well, I'm doing it again. I'm entering some of my knitted projects for judging in the "Homecraft" division of the 2012 Brooklin Spring Fair this weekend.

In other years, some of the judging has been somewhat, shall we say... ridiculous. However, my ego won't let me take a pass. I wasn't really that inspired this year and only have 1 item that I really feel should win first place. But who knows?

For example,two years ago, this worsted weight toque
took first place over my fingering weight, stranded, 4-colour alpaca tam.


And these sweaters,
placed first and second over the stranded Dale of Norway St. Moritz sweater I entered.
I guess I enter my items more for my amusement than anything else.

Anyway, here are this year's entries. My Sheep Heid in the Adult Hat category.
A baby carriage blanket - 24" x24"
These stranded Adult Mitts of my own design based on Norwegian Selbu patterns and in the Seniors class (over 55).
I also submitted my Chrysanthemum Mitts in the general Mitts class.
At the last minute, I threw in these socks for the Senior Socks category. They're my own design, based on Fiona Ellis' "Practice Makes Perfect" design.

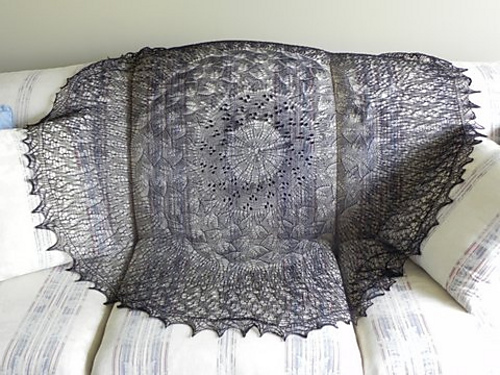
And for the Any Item Not Mentioned - Knit category, I submitted my Haruni shawl knit with SeaCell yarn I hand-painted myself.
My friend, Mo is submitting her Seasons of Persephone shawl into the same category. I'm sure she'll beat me out. But hopefully, I'll get second (unless someone beats me with a worsted weight acrylic blanket or some such thing - meow). 
Wish me luck!

Wednesday 30 May 2012

Missionary Work

By definition, a missionary is:  1. One who is on a mission, 2. One who attempts to persuade or convert others to a particular program, doctrine, or set of principles; a propagandist.

Today, I did some knitterly missionary work.

My friend, Suzanne is an administrator at the local Continuing Education school. One of the teachers, Erin,  is teaching a fashion design course this semester. Suzanne put us in contact with each other to arrange for me to teach the class how to knit. We've been emailing back and forth working out the logistics. I outlined our planning activities here.

On Monday, I met with Erin and wound the 100g balls into approx. 20g balls as each prototype project I knit used about 17g of yarn. Erin scrounged (or 'snaffled' as my spinnerly friend, Jennifer would say) enough sets of 4mm, 4.5mm and 5mm knitting needles for the class of 28, as well as a few tapestry/darning needles for the whip stitching of the sides once the knitting is completed.

 
Yesterday, I asked my fibre-obsessed friend, Julia, if she would assist me today. I thought an extra knitter/aide in the class would help minimize student frustration while they learned this new skill.

Erin, the teacher, got right into it and started her own iPhone cozy. She was really geeked up about learning to knit. (Today was Wild West day at the school - a fund raiser for cancer - so Erin was sporting her pink bandana.)
The student in the foreground is making sure she has the right number of stitches on her needle after completing a couple of rows. At the back, Julia (in turquoise) is checking the girls' progress and clarifying for one of the students.
They then continued on with the garter stitch project.
At the break, I took this photo of one student's work thus far.
And this is the same project a little while later. Progress!!
This is one of my favourite photos I took. This tattooed young man tackled the task at hand and persisted. His positive attitude will serve him well in life.
As the classes are 2.5 hours long, I knew most of the students would have 'got it' by the end of the first class. I'm hoping several will continue on for 'homework' and get close to finishing by the next class in two days. I did refer the students to online videos on www.knittinghelp.com and YouTube which they can peruse in the privacy of their own homes, as sometimes, a review of a new task is needed before carrying on.

I'm really looking forward to seeing how many actually worked on the project between today's class and Friday's class.

I hope to take some more photos and give a full report. 

Thank you, Julia!!!

Thursday 24 May 2012

Better Scarf Pics

I took some better pictures of my woven scarf today. I also washed it to full it, rolled it in a towel and laid it out on the deck to dry under the canopy. It softened up quite a bit, too. My wonky edge is certainly visible but I'm sure my edges will get better with practice.
Here's a closeup of the worst part.
I like what it looked like tastefully folded up.
I'm particularly proud of the hem stitching.
Here the inconsistency in weaving really shows. I had trouble with the stickyness of the yarn and in some places had to use the shuttle to widen the shed and beat the fibres. Also, sometimes the tension loosened on the front beam - somewhat of an equipment malfunction.
However, I learned even more by doing it.

I learned a lot from "Hands On Rigid Heddle Weaving" - a book Stephanie loaned me. And "Weaving Made Easy" from the library was a great reference, too.

I think I'd like to weave another scarf using sock yarn, doubling for the warp and the weft for a faux basketweave look.

Wednesday 23 May 2012

I Wove A Scarf!

After today's success weaving swatches, I thought I'd try to weave a scarf this evening. I had read a couple of blogs where the person had woven a complete scarf in about 3 hours so I thought I'd give it a try. I dug out two 100g balls of  Nashua Creative Focus Worsted weight yarn and started planning.

I wanted the scarf to be about 10" wide.  I warped 50 ends. I improvised yet again by clamping a ruler vertically to the computer desk to serve as a warping 'peg' and warped the loom from about 6 ft. away. I wanted the scarf to be about 5 feet long. I didn't quite use one whole ball for the warp. I finished the first ball up on the weft and used about 40g of the second ball finishing up the weft. I had over a half ball of yarn left  when I had finished weaving.

I was working on my own so once I clipped the warp threads, I tied a big slip knot and hooked a claw hammer into it. This created tension on the warp while I was winding it onto the back beam. I had seen this video on the subject yesterday on YouTube.

Once my warp was on and the heddle threaded, I began weaving. After weaving a few inches, the beating was really fluffing up the warp yarn and in some cases thinning it out. I learned my  lesson not to ever use yarn like this again - unplied singles, sticky and fuzzy. However, I did get the thing finished in about 3.5 hours. And my weaving got more consistent as I went on.

I used the hem stitching I had learned and practiced yesterday to finish the end and then  hem stitched the other end after unrolling the scarf from the front beam.
I don't think there was enough light for my  iPhone to take a good photo.
I haven't given the scarf a bath yet to full it. Hopefully I can do that tomorrow. What a quick and easy way to make good use of some stash yarn. I see a new rigid heddle loom in my future.

Now I just need to use the proper yarn.

The finished size was 10.5" (before fulling) wide by 51" excluding the fringe. With the fringe, it is 62" long. With all of my improvising, I'm impressed I ended up with a project with the dimensions I was hoping for. 

Tuesday 22 May 2012

Improvise, Improvise, Improvise

Today I thought I'd take a stab at warping one of the table looms Stephanie loaned me. I picked the larger one even though I was only going to weave a project that was about 4" wide.

What follows will probably make any legitimate weaver cringe, but I had to improvise and experiment with the equipment I had. 
I had to find a couple of dowels to use as beam dowels (I had to google 'parts of a rigid heddle loom' to find the correct terminology to use).  I cut them to the correct length and cleaned them up a bit and attached them with cord, held in place by (green) masking tape. Improvisation #1 (Sorry for the crappy photo, I used my iPhone camera in poor light.)
First I began winding the yarn on the warping board, carefully creating 'the cross'. When I went to put it on the loom, I realized I didn't know how to thread the heddle on a rigid heddle loom.

I then had to watch this YouTube video before warping the loom. I used multicoloured sock yarn for the warp. I got the warp wound around the beam, wrapping with paper as I went so as not to have the threads interlock.  I warped 32 ends and then the 16 ends through the hole in the heddle. I just used a crochet hook small enough to go through the hole. Improvisation #2.

Once I did this, I realized I had the warp on the front beam instead of the back beam so I just loosened the front beam and wound everything through onto the back beam. Improvisation #3.

The shuttle I borrowed was WAY too long so I improvised with the lid of a wooden pencil box. Improvisation #4.

I decided to use some worsted weight yarn for the weft and I began weaving.

Things went along pretty well. I experimented with beating firmly and then fairly loosely. For the most part, because of the discrepancy between the weights of the warp (fingering weight sock yarn) and the dark green weft (worsted weight), I produced a weft-faced fabric.

This photo actually makes the woven fabric look a lot better than it really does.
My edges leave a lot to be desired. However I could have probably used a floating edge thread and that would have cleared up a lot of the problem.
I then practiced my hem stitch in preparation for ending this piece and starting another using a DK weight yarn in a bright green colour.
Stay tuned...
                 

Monday 21 May 2012

Learning to Weave!

This morning, Jennifer, Diane, Julia and I from the Whitby Spinners, met at the Greenwood Community Centre to take our first lesson in weaving. Dini thought we should create a warp long enough for each of us to weave a dishtowel. We did lots of arithmetic and determined we needed about 3 2/3 yd of warp and 196 ends.

So we began warping on the warping board mounted on the wall.

First, Jennifer had a go.
 
Then Diane and then me with Diane's assistance. Julia deemed me her 'warping bitch' (I think she meant it in a nice way). She wasn't very interested in winding and winding the two cotton yarns.

We learned that 'the cross' was the most important part of the warping as it keeps the warping threads in order. As we were doing 14 ends (threads) per inch, we tied a knot every 7 sets of 2 threads (one blue, one white) so that we could later put them in order on the raddle. We needed 14 sets of 14 threads.
I got so carried away, I did a 15th set of 14. Not to worry.

While we were winding the warping threads, Judy and Julia were counting out the required heddles on each of the 4 shafts.

Once the winding of the warp was finished, it was tied in several places - including the all-important cross - and brought over to the loom where it was wound onto the back post.
We wrapped the roller with paper to keep the threads separate while Dini tugged on the warping threads and maintained a steady tension.
Then we started threading the heddles. We got about 1/6 of the way done and it was time to go. I volunteered to finish threading the rest of the heddles so it would be ready to sley  the reed next week.

Once home, I finished threading the heddles. I tied each set of 12 threads in a slip knot to keep them out of my way. 
Strangely, when I was done, after working right to left, I was short 2 threads to complete the last sequence of 4. On closer inspection, I noted that WAY back  near the beginning of our threading, 2 threads got missed.
I decided to leave them and have Dini or Judy show us how to remove them and attach them to the end where we needed the last two threads.

On my way home, I dropped in to visit my friend, Stephanie, and she showed me some of her lovely woven swatches. She loaned me 3 of her weaving books and two rigid heddle table looms! Now, I just need to watch a bunch of YouTube videos and teach myself how to warp a rigid heddle table loom.

After dinner I met up with Jennifer again for our spinning night - our last one at Coffee Culture for a while - and we yakked about what we had learned today and how inspired we've been by looking at various Ravelry websites. Jennifer told me about this one and I will be spending quite a lot of time in the next few days looking at all the items Jeen has made. Each one of Jeen's project is a mini-lesson in rigid heddle weaving.

Jennifer had taken home the other Dorothy loom to practice various types of weaving and yarns. Today we learned how to do the hem stitch which is handy when finishing the weft in preparation for cutting it and making the fringe. Jennifer did some plain (tabby) weaving and some twill weaving. Satisfied with her results, she passed the practice loom on to me this evening.
I'll practice on it this week and hand it off to Julia or Diane next Monday night.

It was a lot to absorb but lots of fun.  

Friday 18 May 2012

Embroidery Guild

The Trillium Embroidery Guild held its May meeting last week. Although I don't do that much stitching, I do enjoy seeing what everyone is working on.

Every month people bring finished projects to display and inspire us. Norah brought several things in this month.

These finished pieces were no more than 3" wide and stitched over one thread.
Here are a couple of her embroidered pieces.
This bird is exquisitely stitched with silk threads. He looks so fluffy.
Norah once attended a class in making fabric postcards.
In this class, they were given a picture (right) and had to replicate it with fabric and stitching.

Kathy brought in a couple of pin cushions she used for a demonstration when she was teaching people this craft project in Guatemala. She was there on a working holiday, building houses and painting. She liked to paint the little flower pots but the Guatemalans preferred to keep the natural terra cotta clay colour.
Diana then spoke to us for the rest of the meeting about her passion for dolls and doll making. Her particular interest is in replicating classic historical dolls dating from the early 1800s. Some were inspired by stories, and others by museum pieces.

Here she (on the left) is entertaining specific questions about her pieces after we were invited to come up and inspect them.
She antiqued this chest in which she keeps and transports some of her dolls and their clothing and accessories.
As many of the originals are museum pieces and would be extremely expensive to obtain for one's collection, she enjoys the process of researching them and replicating them to a very fine detail for her own collection.
She has also created pieces for her doll houses. Here are three miniature rugs she created using a punch needle to replicate hooked rugs. This one was about 6" wide.

Of course I LOVED the ones with sheep.These two were about 3 1/2" wide.
Here's one with a Maritime theme. The pen was added for the photo for perspective. These exquisite little pieces are SO detailed.

She also gave us a pattern to make this angel doll, if we were so inclined.