Sunday, 28 July 2013

80%

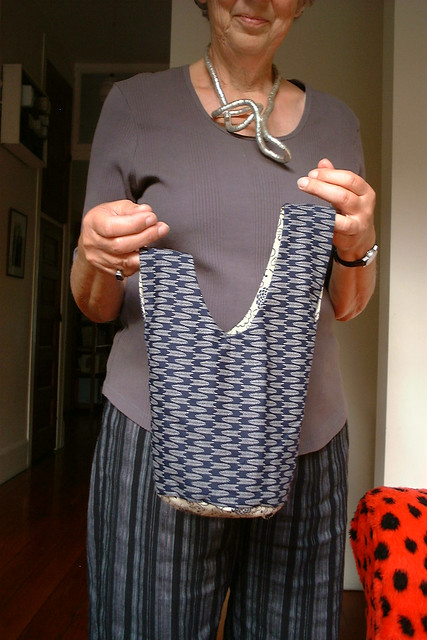
I really like the design of the 'Grab Bags' that I made a couple of weeks ago but wanted to downsize the pattern so one bag could be made with a fat quarter for the outer fabric and a fat quarter for the inner fabric. My printer doesn't have a reduction option but when I was perusing the printing options, I noticed I can scale documents down.

The original pattern is 13 1/4" wide including the seam allowances and I needed it to be a little less than 11" wide to fit on a folded 22" fat quarter. With some experimentation, I tried a reduction to 80% and it was the right size!

Before this reduction, I had already bought 1/2 yd. of each fabric so I was able to make 2 smaller grab bags.

This is what the inside looks like. They are fully reversible but I like the flowery outside and the stripey inside.

Scooter ran another excellent 5K yesterday. He ran personal best at 17:06. 

Surprisingly someone beat him by about 45 seconds. Not sure how that happened. He was bummed he didn't win but somewhat pleased that he had a personal best.

Tuesday, 23 July 2013

Spring Rolls

One of the favourite things I like to eat are Vietnamese cold spring rolls. The other day I looked up a recipe for them online and realized they really are pretty easy to make as long as the ingredients could be obtained.

Yesterday I was in The Big City with a friend and we happened upon the Whole Foods Market in Yorkville. And they had all the ingredients I needed: rice vermicelli, rice wrappers, garlic chili sauce, fish sauce and dipping sauce. Since I was walking and taking the GO train, I figured I'd buy the hoisin sauce back at home as it is very likely to be found in any grocery store.
Today I made a batch - 6 spring rolls - which served as most of our dinner tonight. I used this recipe and added julienned carrots. Slivers of red pepper would be great as well. I couldn't find Thai basil so I used regular fresh basil from the garden. We also have cilantro in the garden that seems to be seeding itself.

I had watched a couple of videos and read comments accompanying various recipes so I had a pretty good idea of how to proceed.

I bought frozen, peeled, raw shrimp as I find cooked shrimp are usually overcooked and rubbery. I thawed the amount I needed and popped them into boiling water for a couple of minutes. I cooled them off by plunging them into cold water and then removed the tails. I then chopped up all the ingredients and assembled them in piles on a plate so I could easily assemble the spring rolls.

The rice vermicelli only need to cook for 3 minutes. I drained them and then ran cold water over them, drained them again and set them aside. I was now ready to begin my production line.

Following the instructions, I dipped a rice wrapper in warm water for a couple of seconds and then put it on a place and added the ingredients, folded in the sides and rolled it up tight. One tip I learned from my research was to not let them touch once they had been made so as to not to stick together or rip.

The result was excellent! (If I do say so myself)
They could certainly be made ahead of serving and chilled in the fridge.

I then made the sauces. The first one was simply the hoisin sauce mixed with chopped peanuts. The second sauce was the dipping sauce from the recipe (in the bowl on the left). We also tried the dipping sauce from the store just as a basis of comparison.
I preferred the 'store bought' dipping sauce but have all the ingredients to make the homemade recipe so will continue to work on improving/perfecting it.

I would also chop up a larger quantity of the mint, basil, and carrots (or red pepper) than the recipe requires for this number of servings.

Yay! I now have another recipe to add to my repertoire.


Saturday, 13 July 2013

Grab Bags

I am always inspired by my creative friends. Mo had a nifty fabric project bag that I thought looked like it would be fun to make. She sent me the link for Helen Heath's 'Japanese Knot Bag'. There is round bottom and two contrasting fat quarters are used.
Photo: Helen Heath
It would be very easy to make a square bottom using the same pattern and omitting the round piece.
A couple of weeks ago I saw a similar pattern in the Spring/Summer 2013 issue of 'Make It Yourself' magazine and after doing an internet search, I found the exact same pattern which looked perfect.
The pattern requires 3/4 yard of main fabric and 1/2 yard of the lining fabric. The original uses the extra 1/4 yd of fabric for the pocket of the lining but I used waste fabric left after cutting out the pattern instead.

I used low-loft quilt batting for the first bag which made it quite fiddly basting it onto the main fabric. So the batting wouldn't get caught in the feed dogs, I basted it with the right side of the fabric down and the quilt batting on the top against the wrong side of the fabric.

For the interior pocket, I sewed around the bottom of the pocket fabric right sides together. I then snipped the curves and turned it right side out through the top. Then I folded the top edges inwards 1/4" and top-stitched the top closed. I then positioned it on one of the right sides of the lining and sewed it into place. You can see from whence I used the scrap fabric for the pocket.

This is what the pocket looks like while looking inside the bag. Perfect for a tape measure, needle gauge, car keys, mobile phone, etc.
I used this nifty button fabric for the main fabric. The finished size is 12 1/2" wide x 18" tall . You could get by using a 2 fat quarters, one for the main fabric and one for the lining if you shrink the pattern to 11" wide. This would yield you a 10 1/2" wide bag. Helen Heath's 'Japanese Knot Bag' pattern (link above) uses the two fat quarters.

I made another bag without batting this time using this cute, dotted print for the main fabric.
'Jap
And this scissor fabric for the lining. I did a pocket the same way as I did for the first one. It didn't photograph well but it is white with black print.
Ta-da!
If you want to make the bag truly reversible, skip the pocket entirely.

This is a great stash-busting project. These bags are always useful for projects, lunches, gifts, etc. It's fun to use bright, contrasting prints, too. I'm a pretty slow worker so the first one took me a couple of hours and the second one only about 1.5 hours. It's definitely a project that can be completed in an evening.

This could certainly be a 'potato chip' project for me. I couldn't make just one and now I'm thinking about what fabric I'll use to make the next ones.

Sunday, 7 July 2013

Hardanger Ornament

I had a lovely afternoon out on the deck. I finished stitching an ornament I started months ago.
The Kloster blocks were previously completed. Last night during the final episodes of the third season of "West Wing" DVDs, I finished the buttonhole stitch around the edge.

Next is the cross-stitching.
Then the Christmas 'trees'.

Then it was time to cut the threads. It is clearly marked on the pattern. Always check that you're cutting perpendicular to the Kloster block threads. Very sharp and pointy scissors are required so only 4 threads are cut.
.Then the cut threads are pulled out leaving sets of 4 threads
Next, the woven bars are stitched.
Then, in the centre, are the branched spoke stitches. I had to 'google' that because the accompanying diagram on the pattern wasn't clear. I think I did pretty well for my first time doing that stitch.

Finally, I added the beads using one red thread and cross-stitches. Ta-da!
I have a couple of ideas for finishing it.

This pattern is a Nordic Needle design from a back issue (200?) of the 'Just Cross Stitch' Christmas ornament edition.

If you've never tried Hardanger stitching, it is certainly worth a try. There are lots of tutorials online and if you look back in any stitching books or magazines, you'll find lots of patterns that you've always dismissed before, thinking that cutting into your fabric is just too scary. Go for it!

Thursday, 4 July 2013

Pride!

On Sunday, Skip and I ventured into The Big City for the 33rd annual Pride Parade. We've never attended before and it was my first large urban parade. I had no expectations and was very pleasantly surprised at what a joyous event it was. Wow! Does Toronto know how to put on a parade!

We emerged from the subway at the corner of Bloor and Yonge Sts. right at the first turn of the parade route. We were several people back from the frontmost viewing spots but gradually as people shifted or left, (due to a woman who screamed frequently as floats went by)  we worked our way to within one or two people from the front. We had an excellent vantage point from there. Skip was a few feet over from where I was standing.
 
 I kept my left index finger in my ear and warded off deafness from the screamer to my left. Lesson learned: take earplugs!

The parade lasted almost two hours! Many groups were represented, some businesses, public transit (TTC), the City of Toronto, GO Transit, teacher groups - including Catholic (!), various church groups, PFLAG, and others supporting LGBT kids and the usual groups one would expect in a Pride Parade.

I loved the sign the Totally Naked Toronto men carried. It left me kind of nostalgic for Captain Underpants - LOL!
Of course, there had to be a Trojan Man. I didn't get the greatest shot of him in the truck, though, but you get the idea.
 A Pride Parade wouldn't be complete without the Viagra balloon.
This was one of the first of many teacher and school board groups supporting LGBT (I'm not sure why the Q is necessary) Pride. (TDSB = Toronto District School Board)
 The mayor of Toronto, Rob Ford, is not only known for his consorting with alleged crack smokers but for not supporting Pride in his city. This event brought hundreds of thousands of people into the city on a beautiful, summer weekend - people who left money here at hotels, restaurants, using public transit and at stores.

This woman (I'm pretty sure it was a woman) with her Toronto City Hall-shaped hat was dressed as "Rob Ford's Pink Skip". Clever.
 One of the coolest moments was when our provincial premier, Liberal Kathleen Wynne (in red) marched with her wife Jane Rounthwaite (in black)  and Canadian Liberal leader, Justin Trudeau (son of former Prime Minister Pierre Trudeau). It is the first time a sitting premier has marched in the Pride Parade.
 I was so proud to be able to participate with the other 1.2 million people who attended in support of LGBT people and the people who love them. I cannot even imagine what it must feel like for gay folks to be able to march proudly in their parade - out in the open - freely being able to publicly be who they are with the love and support of all in attendance.

I got a lump in my throat when I saw the sign, "I love my gay son", as I know more than one person whose parents were not receptive to their 'coming out' and one who after 25 years still doesn't accept that her son is gay nor has met his partner of 25 years.
 My favourite sign was "I love my straight parents ♥♥♥♥♥♥♥".
On a silly note, I noticed that lots of folks were sporting the Toronto Pride logo:
I spent most of the parade thinking the parade was sponsored by Walmart. But on further reflection, I'm guess that wasn't the case - LOL! I doubt all people are created equal in Bentonville, Arkansas. Sad, but true.


 The energy was great! Everyone was in such a good mood! What a joyous event! Afterwards, we strolled down Church street which was a big promenade lined with bars, restaurants and booths. There were more happy people, booming music, a misting tent, and lots of people-watching opportunities. And we got lots of exercise! Next year Toronto is hosting World Pride 2014. What a party that will be!!

Back at home, I continue to work on Spike. I got Seasons 2 and 3 of "West Wing" from the library so have had several evening of marathon watching and stitching sessions.
In the rotation is also Rib and Braid Socks by my BFF, Maureen Foulds.It can be found in her ebook "Twisted Socks: The Cable Collection" and her Ravelry store.
I do my cables without a cable needle and find doing a left (or front) cable easier than a right cable. Since the pattern has more right cables than left, I just switched them all for my convenience. So far that is the only modification I've made.
I normally cast on around 68 stitches for a sock for me with this size needle (2.5mm) and thought with all the ribbing and cables a 72 stitch sock would work but it was WAY too big. I then tried the next size down at 63 sts and it was still to loose. So I began again with the 57 stitch version with an 8" circumference which should work OK.

I have a couple of little stitching projects on deck and am about to assemble the fabric and floss and get started.

And something exciting may be on my knitterly and travel horizon. I'll keep you posted.