Saturday, 13 April 2019

Way Overdue

Last weekend was our guild's stitching retreat. Several of us went up on Thursday and we were joined on Friday by the rest. A couple of people joined us only for one of the days.

I brought tons of projects to work on but really only worked on 4 stitching projects and a bit of knitting.

I got the rest of the pumpkin punched. I now need to fill in the background and the border.


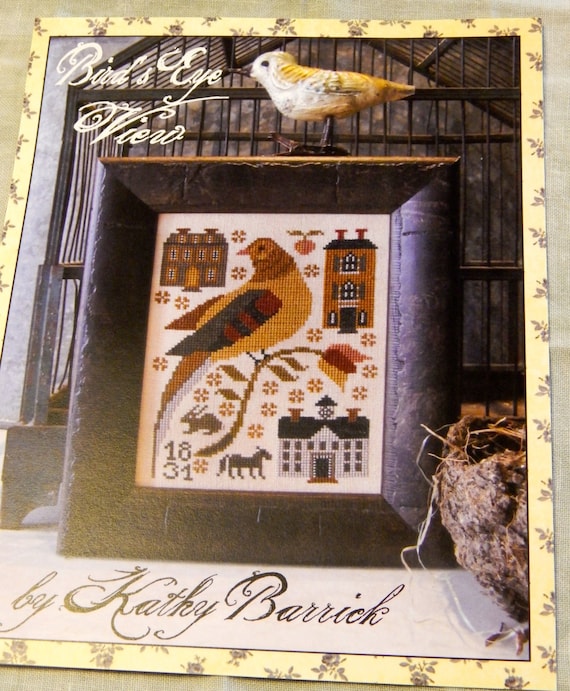
I almost have Bird's Eye View finished. I need to add the date and my initials and fix the 'donkey's' tail.

I started Cinnamon Stars and got the entire house done. I really liked doing the stone work part and am very happy I chose to use a hand-painted floss for the front of the house and the roof.
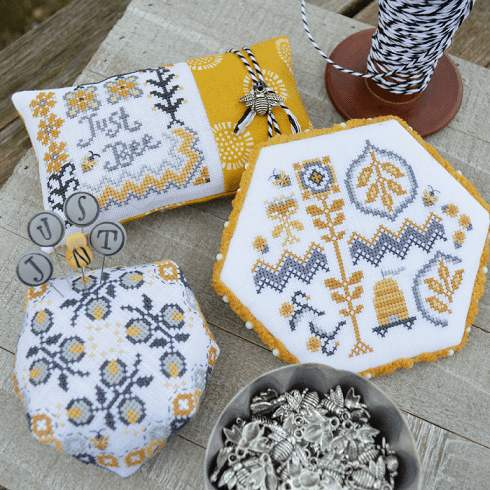
I did some work on my Just Bee set. I still need to add the wings to the bees.
There are three pieces in this set. A hexagonal pin keep (above), a pincushion (below) and a bees-cornu.
The cotton chenille trim and bee charm come with the pattern. 
Image result for Hands on Design bee
We had a great time stitching, gabbing, and eating. A couple of us even took naps. 

When I got home, I discovered that Skip had hired the Got Junk people to take away the treadmill and sofabed from my office. There is now room in there to get organized. I just need to do more purging and sorting and get more shelves and a comfy chair. What a great birthday present in addition to the Garmin GPS he gave me to replace my erratic one. I can speak the directions into the new one - it's totally hands free. I so love gadgets and technology.

Trendsetting with Diamond Painting

I learned about diamond painting on a couple of FlossTube channels. I was intrigued and hopped on the Internet right away and ordered a couple of kits. They were very inexpensive coming from China with a 35 business day delivery with free shipping. In fact they arrived in 4.5 weeks.

The first one I opened was 'Butterfly'. I got started right away.
The hard plastic 'diamonds' or 'drills' are actually round with several facets in the top to make them sparkly. The drills are packaged in a long strip and numbered by colour. Some kits come with square, faceted drills.
The plastic strips aren't resealable so I numbered the ziplock bags which I purchased at a dollar store. Each kit comes with an applicator pen, a square of wax, and a little tray with a spout-shaped edge.
These are numbered with the colour number and the kit number.
Each kit is like a cross stitch pattern printed on some type of fabric.  The legend tells you which colour goes where. The image on the fabric is covered with a sticky adhesive which is covered with a clear plastic or wax paper sheet to protect the adhesive. Wax is put on the tip of the drill pen and a single drill is picked up and placed where it should go on the sticky fabric's symbol. There are also drill pens that can pick up several drills at a time. Some videos recommended that blue tack stuff that we used to use to stick posters up on our bedroom or classroom walls. Supposedly it works better than the wax. 
One has to decide where to start and only peel away a small part of the painting to work on at a time. I chose to start on the top left.
Once I got going I couldn't stop! I stayed up WAY too late and finished almost half of it.
Here's the picture of another kit I ordered. However, it is small so the detail won't show up that well. The bigger the better for good detail.
I have lots to do today around the house but hope to get back to this at some point.
Kits are available from Amazon at about 4x the price I paid ordering directly from China. Amazon selection is still pretty limited although the quality of the printed fabric might be better.

LED light sheets can be purchased to illuminate the fabric from behind making the symbols easier to see. I just used my OTT lite from above and had no trouble seeing most symbols. On some kits from other companies, the colours also correspond to DMC colours.

Have a look at a few diamond painting videos on YouTube to see if it is something of interest to you or your family.

Generally, these kits can be ordered in various sizes - the bigger the size, the better the detail. Most can also be ordered as cross stitch kits in 4 formats: counted cross stitch with blank fabric in 11ct and 14ct Aida, and printed cross stitch on 11ct and 14ct. Aliexpress is only one place from which they can be ordered. Just Google 'diamond painting' and have a look.

I predict this will become quite a craze very soon in North America, much like the adult colouring books did. Did you know 30% of all book sales last year were the adult colouring books? That's why you saw them everywhere. Diamond paintings would be a fun family activity at the cottage or when everyone is together - all working on a different corner at a time.

I found it to be very relaxing - quite Zen. Skip even remarked that I seemed quite mellow whilst doing it.

Mark my words - diamond painting will be a new fad very soon.

Monday, 1 April 2019

After Monday's Stitching

I stitch with a bunch of lovely ladies on Monday mornings. Today I focused on Bird's Eye View. I did more this afternoon. I have the wing to finish and will be working on the back and head.
There's another house on the top left
Image result for bird's eye view Kathy Barrick

I topped up my floss for a couple of other projects I want to take to our stitching retreat and bought some chalk paint for some of the raw wood pieces I've purchased to finish some of my projects.

Our stitching retreat is only 3 sleeps away and we're frenetically trying to figure out carpooling and what to take. I'm bringing enough supplies for people to make needle minders. 

Sunday, 31 March 2019

Wow! That Goes Really Quickly!

I started this punch needle project last night.
It's a kit I bought at The Old Tattered Flag last fall. I'm going to modify the border because I want it to be squared off rather than wavy and curved at the top.
This morning I finished the leaves and started the pumpkin.
These are Sullivan flosses that Julie Thomas dyes herself under the OTF brand. The variegations will really show up when I do the background in Dirty Linen.

I'd better get another one of these projects ready for the retreat next week as this one is going to finish up quickly.

Saturday, 30 March 2019

Lilac

I finished the punch needle piece today. I used #8 Valdani thread in JP1 colourway (Sunwashed) for the background.
I simply mounted it on a piece of foam core - nothing fancy.

I need to paint these little easels that I've had in my stash since last fall. I may be investing in some chalk paint because no prep or sanding is required before application. 

Today Jen1, Marilyn, and I went to The Gathering in Port Hope.  Also meeting us there were Alexa, Annie, Donna, Terry, and Betty. We also saw Rosemary and Gini from Windreach. Mo also joined us. There were lots of great vendors.

After dropping Marilyn off, Jen1 and I went to Fabricland for their 50% off sale.

Now the focus will be planning what projects to take to Elim next Thursday - Sunday.

Thursday, 28 March 2019

Hoop De Do!

My Morgan lap stand hoop came today! It's great for doing punch needle because it holds the fabric drum tight and the stacked hoops (7" and 10") keep one from stabbing oneself whilst punching.

In anticipation of its arrival yesterday, I traced the pattern onto my fabric (weaver's cloth). As the punching is done from the back and shows on the front, the pattern needs to be backwards on the fabric.

It's "Lilac Garden" by Michelle L. Palmer and was printed in the Spring 2018 edition of Punch Needle and Primitive Stitching magazine. I have a digital subscription which entitles me to 4 new issues and one year of back issues for a mere $24 US.

 The original pattern measured 4" x 7" but I didn't want to make it that big. A) that's a lot of punching, and B) that's a LOT of floss. I reduced it to 80% on my printer which brought it down to 3 1/4" x 5 3/4".

I got this much done in just a couple of hours this afternoon.
This is what the front looks like. The word 'Lilac' will be better defined once I get the background filled in.
I already have planned how I'm going to FFO it (finally finish).

The PNPS magazine has both punch needle and cross stitch patterns. I think the subscription is a really good deal as there are no shipping costs, no hard copy to store, and because it's digital, it is much less to produce and distribute. I've had no trouble printing the patterns on my printer once they're converted to .pdf format.

I've also been getting a lot done on my Kathy Barrick "Bird's Eye View".
I turned the horse into a donkey by making the ears longer but my stitcherly friends tell me the tail is too long for a donkey so I'll pick out those stitches and make it a bit smaller. I rather like the definition of stitching on 40 ct fabric and using only one thread, I don't need to 'railroad' to get the thread to lie flat.

I need to get my 'Cinnamon Stars' by Plum Tree Samplers kitted up and ready to take to our stitching retreat next week. I like to take lots of projects to the retreat so I don't run out of things to do. There may be another punch needle project to take as well. That reminds me, I still have the Drawn Thread 'Stars' project to take and finish.

Skip and I got our taxes done today. Ours are so simple but with income splitting, I can't be bothered trying to navigate through the tax prep CD that can be purchased. The preparer gives us a loyalty discount as we've been having her do our taxes for years and she did Skip's parents' taxes before us. She also gave Skip a senior discount. Rats! I should have waited until after my birthday so I could have got the senior discount, too.

On the way back home from Port Perry, I stopped into Myrtle Station Wool and bought the yarn to knit another Cunningham baby blanket as yet other friends of ours are becoming grandparents again.

Sunday, 24 March 2019

Project Bag Blitz

I made 4 more project bags with vinyl windows. Everything came from my vast stash, including all the threads and zippers.

I went for high contrast with the lining for the turtle batik fabric.

 I now realize this is probably Sleeping Beauty fabric. There's a witch, a rose, a castle, a prince, and princess but I don't see anything that looks like she's being awakened with a kiss.
I really like the lining fabric on this one.
This hedgehog fabric is so cute! I used the apple green lining fabric again, including above the zipper as I didn't want to cut any hedgehogs in half to fit there.
These are really fun to make but do take a couple of hours each from start to finish.

Last night I finished knitting the Cunningham baby blanket. I want to block it tonight so it will be dry by Tuesday for 'show and tell' at spinning.