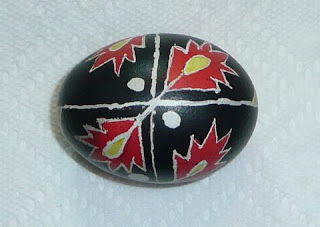
Marion and Elaine were a lot more creative than I was and pretty much designed their own patterns. The white egg is first washed with a vinegar and water solution and dried. Only those with intact and smooth shells will be used as even the smallest shell imperfections will result in a broken egg and a really bad smell. The eggs are not blown out so when they're put in the jar of dye they will sink to the bottom. After a few years the inside will dry up and the yolk will be like a little ball inside. Some people do blow the eggs out after dyeing them but they must be sealed first so the dye doesn't run. The little holes are then sealed with beeswax. I prefer to just leave the egg intact.
Pencil can first be used to draw guidelines or designs on the egg. Whatever will ultimately be white is then drawn on the egg with the kistka. The kistka is basically a small copper funnel attached to a stick with copper wire, in which the beeswax is melted over the flame of a candle - in our case we used tealights. The tip is then drawn along the egg and the melted beeswax adheres to the shell. The egg is then dyed the next lightest colour - in this case, yellow. I then drew on the egg what ultimately would be yellow lines. Then the egg was dyed red.
Here, I'm filling in all the areas that will ultimately be red.
After this, I dyed the egg black which was my final colour.
Now comes the fun part. We take the dried, waxy, black egg and hold it near a candle flame to soften and melt the wax, which is then wiped away with paper towel.
Once all the wax is all wiped off, the egg is sealed with varathane and dried for 24 hours.
And here they all are drying after being varathaned. Elaine's are ones with purple and turquiose, one above the other at the far left. Marion's are both on the bottom right and mine are on the top right.
These two are mine.
This was Marion's first attempt. I think it turned out very well.
The basic supplies are:
- prepared dyes stored in wide-mouthed jars (vinegar is the mordent)
- kistkas of various sizes
- beeswax (I used the sheets often used for rolled candle making and also have one of the wax 'pucks')
- tea lights
- candle
- newspaper to cover work areas
- lots of paper towels (to cushion egg at the work area, to dry the eggs off, to clean up any messes).
I have also seen Pysanky drawn with Christmas and Hallowe'en patterns.


Those are beautiful Geri!
ReplyDeleteThis is a very informative and interesting description of Pysanky. I have read a children's book about it and have seen a video of the children's author Patricia Polacco making Pysanky. In all this vast experience I failed to learn that one could do this without blowing the innards out of the egg. The technique you used is less work, but I suppose less breakfast. They turned out lively and bright. I like them.
ReplyDelete