Sunday, 25 September 2022

Fabric Counts Lie

I'm starting to amass the projects I'm taking to my stitching retreat next weekend. I started a new project last night - one of the many that I'll work on while there - Durene Jones' 'Sunflower Scissor Case'.


What? It's triangular? What a coincidence! (Insert winking emoji here).

The two, blue #5 perle cottons were the only ones I had to buy as I had everything else in my stash. I substituted a dark yellow for the called-for yellow that looked exactly the same on the floss substitution tool. 

I selected a Charles Craft Irish linen from my stash* - supposedly in 28 ct. You know - the ones you can get in the tubes at the big box craft store.

I normally mark the top of my piece so I can keep it oriented properly. Once I had completed the Kloster blocks in the centre, I realized that somehow it got rotated 90º which made the motif closer to the edge than it should have been. Thank goodness I had cut the fabric in a 9" square for this 5" square project. I wasn't going to run out of fabric after all.

I did modify the pattern a bit as it calls for 25ct so using 28ct fabric was going to make it proportionately smaller. My solution to that was do the math to get the side lengths I needed for a 5" square (14 sts/in x 5" = 70 sts). I then push the motifs to the opposite corners, leaving more space at the top of the front and flap.

So I happily stitched away and completed the backstitching all around. I did substitute #12 perle cotton for two strands of DMC in the same colour. Then it looked too big, so I subtracted 7 sts and re-did the backstitching on the sides of the flap. I then measured and the outer dimension which was supposed to be 5" was only 4.5" and the inner dimension which was supposed to be 4.5" was only 4". This means the fabric was actually 31ct. What??? Who knew commercial fabric manufacturers lied?

So I've decided to unpick the inner backstitching and go with the 4.5" case rather than only 4". 

Sheesh!

That little scissor fob wouldn't take that long to do either. I like how it is assembled like a mini biscornu.

Durene's instructions are really detailed for the most part. If Hardanger technique is new to the stitcher, her description of the steps would be very helpful.

There's also a sewing pouch in this series - which could also be finished as a floss catcher, needle case, or even part of the front of a project bag,

and a very uniquely-shaped pin cushion pot. This shape makes me think of how I could design one with EPP hexies on the outside...
Instead of the eyelets, I like to add 'bling' with my Hot/Fix jewels - far less tedious. Her instructions call for sewing the fabric behind the open work of the Hardanger into place but I have found that laying the backing onto the back of the openwork, then fusing everything into place with thin interfacing works well. 

I love Durene Jones' designs with the little bits of Hardanger. She has a few themed sets like this and many other patterns - all available in her Etsy shop.

Only 4 more sleeps 'til our retreat! I plan to do a rotation among all the UFO/WIPs that I'm taking. In some cases, just an hour will finish the stitching completely. I also will do a bunch of work on the Teresa Kogut sampler I'm working on and possibly, if Lori sends me Pumpkin House #4, I can get a good start on that. 

*SABLE - Stash Acquisition Beyond Life Expectancy

Friday, 23 September 2022

More of the Same

A local dollar store had these great craft storage containers. I like the removable dividers - perfect for some of my tools and hexies ready to stitch.
I've been making 1", 3/4", and 1/2" templates by printing sheets onto card stock in my printer - making sure they're scaled to 100%.

The 1" ones went the fastest. The printed sheet is glued to 3 other sheets so 4 at a time are cut out.
Maker Jayne has a great video on how to do this. Here's the link to get her templates.

I ordered a pack of 56 - 9 3/4" pieces of printed fabric from Amazon. They are small prints which are perfect for paper piecing. The fabrics are very thin - not quilter's cotton but fine for what I'll be using them for. I may hand wash and press them to get them to shrink up a bit.
They were bundled by colour.

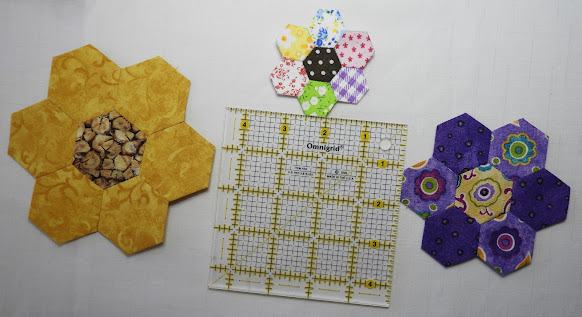
I made this with my newly cut 1/2" hexies.
It's itty bitty! There's such a difference in size from the 1" sunflower, to the 3/4" purple flower, to the 1/2" multi flower. I now understand why they have 1/8" gradations.
I used a really thin nylon monofilament thread to sew the little one together. It saved me having to find thread colours that would work. It's hard to tell but the centre is polka dots on dark brown fabric.
Last night I got my two rosettes sewn together. Now to make the third one which will match the one on the left, fill out the corners, add batting, sashing, a backing, and quilt it all together. 
 I may do some embroidery embellishing as well.

Wednesday, 21 September 2022

Down a Rabbit Hole

I used up all of my washable glue pen on Sunday. Amazon would have taken a couple of weeks to deliver one and shipping would have been extra. Local quilt shops aren't open on Sunday and Monday so I had to wait until TUESDAY to get the glue pen I needed and some more hexie templates.

In the meantime, I experimented with what I had and just using scraps and the 3/4" templates that came with the hexie kit. The fabrics are really random with blue being the only common factor. I did fussy cut the bee in the centre.

Then I made another sample from a partially-used jelly roll. This way the colours are designed to coordinate. I realize I needed small motifs so that narrowed my choices somewhat. 
I'm now on the hunt for ideas for using these hexie 'blocks'.

I started the kit and got this much done on Sunday evening.
The kit has supplies for 5 of these but I only need to make three for the particular project I have in mind.

I got going early on Tuesday morning to try to get the supplies I needed. The first store didn't have any hexie templates. They were in stock but no one could locate them. I was able to purchase the glue pen and some #10 Tulip appliqué needles there. Off I went to the next shop. There, they had the hexies I wanted in 1" and 7/8" sizes.

Sue Daley seems to be the Queen of English Paper Piecing. Although she's Australian, many of her products are made in Japan and are available here. I'm trying to decide if I'll get a small rotating cutting mat for cutting fabrics myself.

I've been using my little cutting mat and rotary cutter. That Purple Thang is helpful for pushing the glue fabric off the template so I can pull the templates out of the hexies that have been sewn on all sides. I love Love LOVE the green-handled micro-serrated scissors. Tula Pink recommended the #10 Tulip Appliqué Big Eye needles. They are a little shorter than the Clover Black Gold needles I purchased last week.


Last night I made this. I didn't get it finished because I forced myself to go to bed early. I had to get up early to attend my first in-person yoga class in two years.

Raiding my scraps again, I whipped up this sunflower using my new 1" templates.
With a bit of batting on the back, I will experiment with embroidery to embellish it. The 1" hexies are a good size for making this into a pincushion.

My brain is whirling with all kinds of possiblities.

Tonight is the Trillium Embroidery Guild's first in-person meeting since February 2020. Although I have seen many of my stitching buddies,  it will be pretty neat to see everyone in person again.

Last June I distributed templates for folks to design their own piece of stitching to be fashioned into a triangular scissor case. Tonight I will be going over the instructions on how to assemble the case with its lining.  

Friday, 16 September 2022

Not That I Needed a New Obsession or Anything...

Inspired by the hexie kit I purchased yesterday, 

I started attaching some of the fabrics to the hexie squares.  


My plan is to do three out of the 5 'flowers' for the little table mat I have in mind. While I did this, I watched a few videos on YouTube on this new-to-me technique. 

Of course, I needed something to contain all the little hexies I had made.


They fit quite nicely in here.

One of the videos inspired me to make a little hexie cluster with some of my own scrap fabrics. With my little cutting mat, I used some of the cardboard templates from the kit and trimmed my own scrap fabrics to fit.

With them all glued to the templates, I could begin sewing them together.

I'm not a huge fan of hand sewing but the whip stitching didn't take long at all.
I can see how one can become quite addicted to the meditative sense while at the same time, creating something that is darned cute.
My plan is to affix it to a piece of fabric and create a pin cushion. I can envision using projects like this for needlebook covers, decoration on project bags, stitchery totes, and the like.

My brain is whirling with all the possibilities.

Our First Road Trip in a Long While

Yesterday, Jen1, Marilyn, Barb, Poppy, and I ventured to a pop up shop at The Farmer's Wife Retreat House near Beaverton. It was sponsored by Border Creek Station, a relatively local online quilt shop.

At the house, the beds in all three bedrooms had beautiful quilts on them, many with the kits to make the quilts. many were hung up as well. In the main hall upstairs, we watched an informative demo on English Paper Piecing (EPP). Of course, I had to buy a kit for a little project. I have the perfect place in mind for this when I get it finished.


Included in the kit are the instruction sheet, all the fabrics cut out, fabric for the sashing and back, and all the cardboard hexies.
There is also a fancy thread kit that was highly recommended but since I don't anticipate at this stage that I'll be doing a lot of this craft, I held myself back from that investment. Regular sewing thread is all I need at this point. I did, however, buy a pack of the recommended #9 appliqué needles.
I also purchased another kit which I can machine-quilt. 

The sample on display was irresistable and featured some embellishing as well with perle cotton. It will require a lot of sewing on the bias as all the little triangles are cut out. The coordinating backing fabric wasn't included in the kit but was packaged nearby.
In addition, I broke down and purchased a Purple Thang, a tool I've seen on many YouTube instructional videos and also used by the person doing the EPP demo.

Once finished there, we then decided to head east to Bolts and Bobbins in the greater Woodville area.

I didn't have anything particular in mind that I needed to get but I did pick up two Moda charm packs which I could use for some project or other: Spring Brook:


and Promenade.


It had a very French General sense to me.

We then headed to Lindsay for lunch at the Symposium Café, and on to  Appleseed Quiltworks for some more shopping. I almost bought an 'I Spy' charm pack that had been made up from random fabrics from the shop but I wasn't all that enthused with the collection so I put it back.

While bombing around to all the places we excitedly discussed the various crafty events in which we are participating - well into 2023. We are all looking forward to our guild's retreat at the end of this month - four days of crafting. I wonder how many of us will be taking a new project we bought yesterday?

Wednesday, 14 September 2022

Seeing Double

I stitched this project a couple of years ago and decided to make two more ornaments. That random star was just my practicing. I used the extra large star from a Drawn Thread pattern I had in my stash.

I used 34ct Cosmo linen and the called-for DMC threads except a substitution for the called-for green. I used Cody Hoover's floss color tool (substitution tool) for that. 

The pattern is Barbara Ana's 'Holy Night' from the 2019 Christmas/Winter issue of Punch Needle and Primitive Stitcher Magazine.

I stitched a Rhodes star, used gold Mill Hill beads for the stars and HotFix jewels for the snowflakes.
The cording will be one of the red colours and I have winter-themed fabric that will be the back.

It kinda looks like a snowglobe. I like the star patterns in the snow.  
So sparkly.

I have a good start on the piece Teresa sent me to stitch for her. There's a lot of filling in which is good for social stitching. I also finished the third house from Pansy Patch Quilts and Stitchery's "Houses on Pumpkin Hill" and await the 4th. Lori wants to release #3 and #4 in November. I'm pleased I've been able to keep up with my stitching commissions and still get some of my own stitching done.

Yesterday, Skip and I visited one of his mother's cousins in Stratford for the afternoon. On the way, I finished knitting the second heel sock. Basically, I just knit the heels and bind off once the gusset decreases are done. I used odd ends of yarn (the two aren't even the same colour) and didn't bother measuring the second one against the first.

I used an eye of partridge heel and continued the staggered K1, sl1, pattern on the bottom of the heel where I need extra thickness. I wore that area out on my previous pair.
I have very dry skin and put moisturizer on my heels at night. These heel socks keep my bedding from getting moisturizer on it. They're easy to wash, too.

Tomorrow 5 of us are going to a retreat place near Beaverton to attend a the  the SEW Quilty Friends Event IV of Border Creek Station. I have really missed spending time with my stitching friends. 

I had several over last Wednesday for a stitching day. This required that I clear all the crafty stuff off my dining room table where I've been working on various projects for the past 2.5 years. Since it was all tidied up, I hosted my Monday morning group this week as well.

Next week is our first in-person guild meeting since February 2020. The Trillium Embroidery Guild will also be celebrating its 25th anniversary with cupcakes and beverages. I'll also be  doing a little tutorial on finishing square stitched pieces into triangular scissor cases. During the summer some folks have worked on getting a stitched piece ready for this.

The fall has really shaped up to be full of lots of fun things.

Sunday, 4 September 2022

Men's Blue Socks

For a while, I always had a pair of socks 'on the needles' and would knit away while watching the copious amount of YouTube videos at night with Skip. But I kinda stalled this summer. 

However, I re-started my pledge and finished up another pair of socks using my regular formula: 3 x 1 ribbed leg with 2.5mm needle,  eye of partridge heel and bottom of the heel with 2.25mm, extra length for a man's foot.

I'm not sure if I planned it but they turned out to be identical twins.

I don't remember what yarn this was as I had previously started a different pair with it but the intricate pattern I was knitting got totally lost in the patterning of the yarn so I frogged it.

I do continue the eye of partridge heel on the bottom of the sock as it provides an extra layer and will minimize wearing out in that area.
Basically, I turn the heel in the normal way but put stitch markers on each side of the centre sts and continue the slipped stitch pattern between the two markers.

I am beavering away on the next Pansy Patch Quilts and Stitchery house in the series: Houses on Pumpkin Lane. I want to get it done before I receive my next project from Teresa Kogut which could arrive next week.

This placement chart gives you an idea of what the piece will look like with all 9 houses. I've done Charts 1 & 2 (available for purchase from your LNS).


and am working on Chart 3. The vertical borders are free on the placement chart and the borders above and below each house are included in each pattern in the series. The 36ct fabric is Sand by Picture This Plus. I really love the autumnal theme with pumpkins, acorns, birds, and flowers. Each house's door will feature an iconic quilt block (churn dash, pinwheel, etc) and occur in other places on the house as well.

My stitcherly friends and I are looking ahead to all our activities for the fall. As of now I have two stitching retreats, a day trip to a quilting event, and we're trying to nail down some dates to finally visit the Hobby House Needlework shop in Pittsford NY - a suburb of Rochester. Hobby House opened a beautiful bricks and mortar shop in the Erie Canal area during COVID and we are finally able to plan a visit there. We all have our vaccinations up to date and ready to do our ArriveCan stuff on our iPhones for our return home. 

Skip and I will be spending a couple of weeks in the Rio Grande Valley as well.

So much to look forward to after 2.5 years of being cooped up.

Saturday, 3 September 2022

It's the Little Things...

We have a utility shelf in our laundry room with all kinds of stuff on it: work gloves, caulking, lubricants (7 different types!), cordless drill, staple gun, glue guns, screws, nuts and bolts, wall anchors, etc. etc. and a bunch of hand tools. In front is our indoor drying rack with is directly across from the clothes dryer. (Skip's hand tools are in the brown rollup with the green straps on the floor.)

During COVID I sorted and organized all the screws, nuts and bolts, etc. into dollar store containers.

The shelves still look cluttered but I am able to find what I need to find in fairly short order as the area has been functioning much better. But I needed better access to my hand tools which were in a big plastic tool box with a lift out shelf. I could never see what was in the bottom and always had trouble finding the tool I needed.

Yesterday, Skip and I went out for breakfast then over to Home Depot and bought a metal tool chest with 3 drawers* that would fit nicely in the space the plastic tool box was in. It wasn't rated very high in durability for workers who haul stuff to job sites, but for my purposes, where it is just going to sit on a shelf, it is perfect.


I used my Bluetooth labeler to label the drawers. The labeler prints via an app on my iPhone.
I also bought a non-skid bath mat at the dollar store to cut up and line the bottoms of the metal drawers so the tools wouldn't slide around. I just eyeballed it but when I got it home, not only was it the correct width for the drawers, but it cut into the 4 pieces, exactly fitting the depths of the drawers! And the liner is white so I can better see what is in the drawers.


My lesser-used items are in the grey top compartment as I have to get on my tippy toes to see what is in there but the other items are really easily seen now.

There are still some things I can discard but for now, I'm very happy all my stuff fit in the chest and what I need is easily accessed. 

It's the little things...

* Fortuitously, during my online research the night before I had taken a screen shot of the item and its price. When we went to buy it the next day, it had gone up $10! Because I had the photo on my phone, the cashier honoured the lower price. Winning!